Mouse Automation Macro Actions for Script
Apart from Mouse Clicking, you can automate a variety of Mouse Actions from your Macro Script. You can even automate Mouse Actions which require Keyboard Input apart from Mouse Input, like Ctrl + Click, Shift + Click, etc. Have a look at the screenshot below, which displays Mouse Automation Actions available for Automation by this Windows Automation Software.
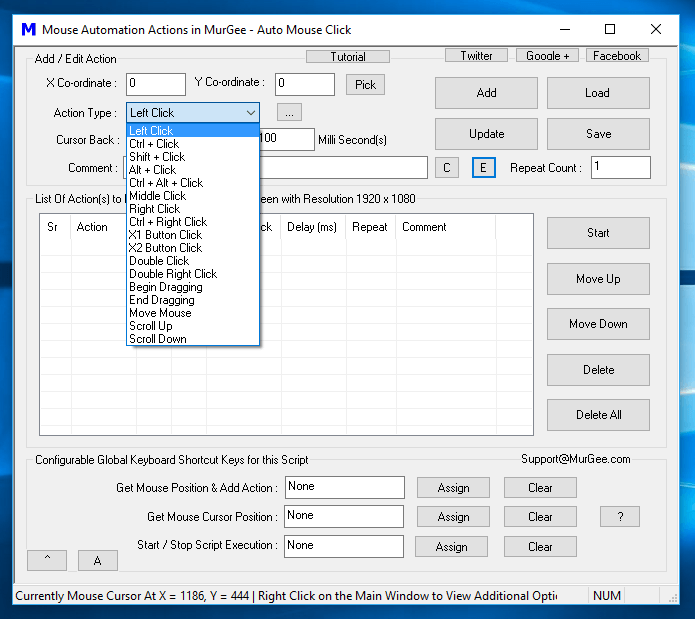
As displayed in the above screenshot, a variety of Mouse Actions can be automated with this Mouse Automation Software. If you look closely, you will find that you can even automate Mouse Actions which require Keyboard Input apart from Mouse Input to your Windows Computer. Given below is a short description and the purpose of each and every Mouse Automation Action supported by this Windows Automation Software.
- Left Click: This Mouse Action allows you to simulate / automate a Left Mouse Click, which is a combination of pressing the Left Mouse Button, waiting for a short time delay, and then releasing the Left Mouse Button. On Windows Computers, the Left Click is normally referred to as a Mouse Click and can be used to select an object on the Screen, press buttons, and for a variety of other purposes.
- Ctrl + Click: The combination of the Ctrl Key and Left Click as mentioned above is referred to as Ctrl + Click. On Windows Explorer, you can use Ctrl + Click to select individual Files. Ctrl + Click is also used in lots of Online and Desktop Games for selecting Game Objects and is often used for other purposes as well.
- Shift + Click: The combination of the Shift Key on the Keyboard and Left Click as outlined in the first Action above is referred to as Shift + Click. In Windows Explorer, you can use Shift + Click to select a range of Files between two Screen Locations. Shift + Click is also used in Online and Desktop Games for the selection of Gaming Sprites / Objects.
- Alt + Click: The combination of the Alt Key on the Keyboard and Left Click as outlined in the first Action above is referred to as Alt + Click. This Mouse and Keyboard Input combination is often used in Photoshop and other dragging operations on Windows Explorer and other Windows Applications.
- Ctrl + Alt + Click: In this Macro Action, the Ctrl Key is pressed, then the Alt Key is pressed, and then a Left Click is simulated, followed by releasing the Alt Key and finally releasing the Ctrl Key.
- Middle Click: Pressing and releasing the Middle Mouse Button / Trackpad is referred to here as a Middle Mouse Click. Even if your Physical Mouse does not have a trackball, you can use the Middle Click on Windows Applications which support it. Middle Click is used in browsers to close browsing Tabs, open Links in a new Browser Tab, and the purpose of the Middle Mouse Click varies as decided by the appropriate Windows Application.
- Right Click: A Right Mouse Click is basically pressing and releasing the Right Mouse Button with a short time delay. A Right Click is often used to display a Context Menu, which normally offers functionality to configure the application behavior or to simply provide an easy way to handle data presented by any Application.
- Ctrl + Right Click: A Right Click with the Ctrl Key is referred to here as Ctrl + Right Click. The usage of Ctrl Right Click depends on the Windows Application or Game on which it is performed.
- X1 Button Click: Pressing and releasing the 4th Mouse Button is referred to here as X1 Button Click. The 4th Mouse Button is present on a Gaming Mouse, and X1 Button Click is used in playing Games and is also supported by Browsers for easy navigation. Yes, even when you are using a 3 Button Mouse, you can simulate this X1 Button Click from any Macro Script.
- X2 Button Click: Pressing and releasing the 5th Mouse Button is referred to here as X2 Button Click. The 5th Mouse Button is present on a Gaming Mouse, and X2 Button Click is used in playing Games and is also supported by Browsers for easy navigation. Yes, even when you are using a 3 Button Mouse, you can simulate this X2 Button Click from any Macro Script.
- Double Click: Pressing and releasing the Left Mouse Button 4 times is referred to as Double Click. The Double Click Mouse Action is used to open a file or launch an Application in Windows Explorer. Many Online and Offline Games provide Double Click as a quick way for Gamers to interact with the Game.
- Double Right Click: Pressing and releasing the Right Mouse Button 4 times is referred to as Double Right Click. Many Online and Desktop Games provide Double Right Click as a quick way for Gamers to interact with the Game.
- Begin Dragging: This Macro Action presses the Left Mouse Button only. Unlike Left Mouse Click, the Begin Dragging Mouse Action does not release the Left Mouse Button. Mouse Dragging is often used to select or move Files to a different location in Windows Explorer. When using Begin Dragging in a Macro Script, you must add a Move Mouse Action immediately after the Begin Dragging Mouse Action.
- End Dragging: Releasing the Left Mouse Button after a Begin Dragging and Move Mouse Action is referred to here as End Dragging. This Action must be used only in combination with Begin Dragging, Move Mouse, and then End Dragging to move selected object(s) from one Screen Location to another Screen Location.
- Move Mouse: Moving the Mouse Pointer to a different Screen Location identified by X and Y Co-Ordinates is referred to here as Move Mouse. This Mouse Action does not press any Mouse Buttons and only moves the Mouse Cursor from one Screen Location to another.
- Scroll Up: Moving the Mouse Wheel in an Upward direction is referred to here as Scroll Up. When the Scroll Up Action is executed, then Movement of the Scroll Wheel in an Upward direction by 1 Notch is simulated by the Script. Scrolling up is normally supported by Windows Applications when a Vertical Scroll Bar appears to present Vertically Long Data like a Webpage or anything which requires Mouse Scrolling.
- Scroll Down: This Macro Action works exactly like the Scroll Up, apart from one difference that in this Mouse Action, Scroll wheel Simulation is done in a downward direction.
In the above-mentioned Mouse Actions, a Short Time Delay is mentioned along with Left Click, Right Click, Shift Click, etc., which is also configurable from the Settings Screen of this Mouse and Keyboard Automation Software. Note in the below screenshot that the time delay between Mouse Down and Mouse Up / between Key Down and Key up is configurable as a Random Time Delay, as most of the time, we humans do take a different amount of time when pressing and releasing Mouse / Keyboard Keys.
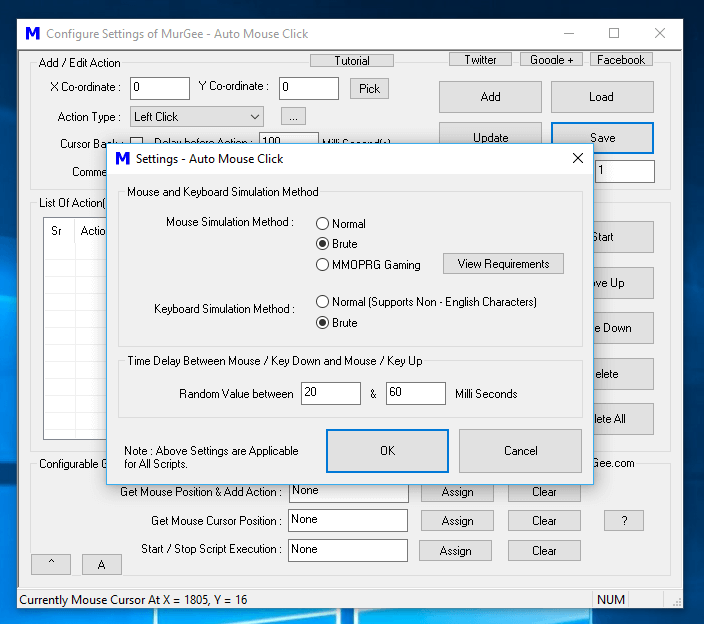
Settings Screen to Configure Mouse and Keyboard Simulation Method and Time Delay between Mouse and Key Up
The Total Time required for a Script containing Mouse and Keyboard Input depends on the Time Delay specified for each Macro Action in the Script, the Repeat Count of each Macro Action, the Repeat Count of the whole Macro Script, and the time delay between Pressing and Releasing of Mouse Buttons / Keystrokes.