Click at 2 Different Screen Locations with a Script
When you want to Click at 2 Different Screen Locations, you can create a Script and execute the Script which in turn will Automatically Click at pre-defined Screen Locations. The Given below Screenshot displays a Script in which 2 Left Click Actions have been added and a Keyboard Shortcut F6 has been assigned to execute the Script. In this post let’s walk through the steps required to create and execute this Macro Script.
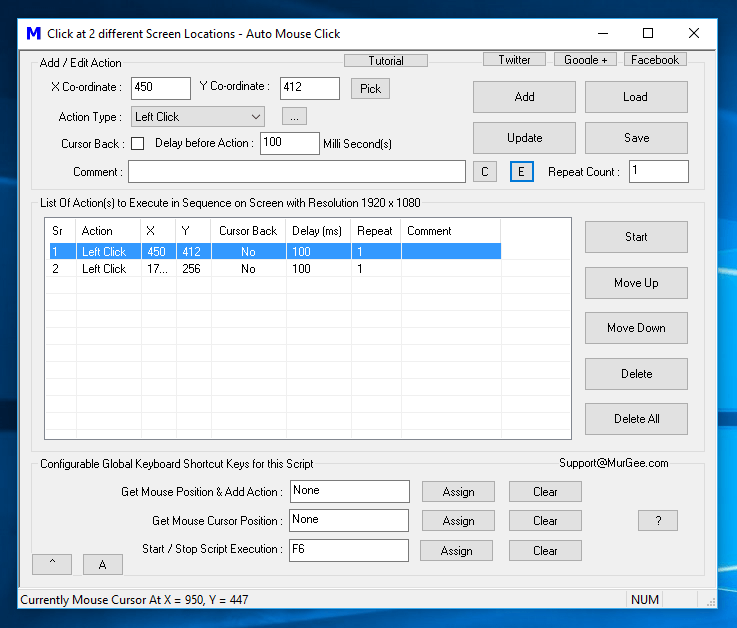
Click at 2 Different Screen Locations
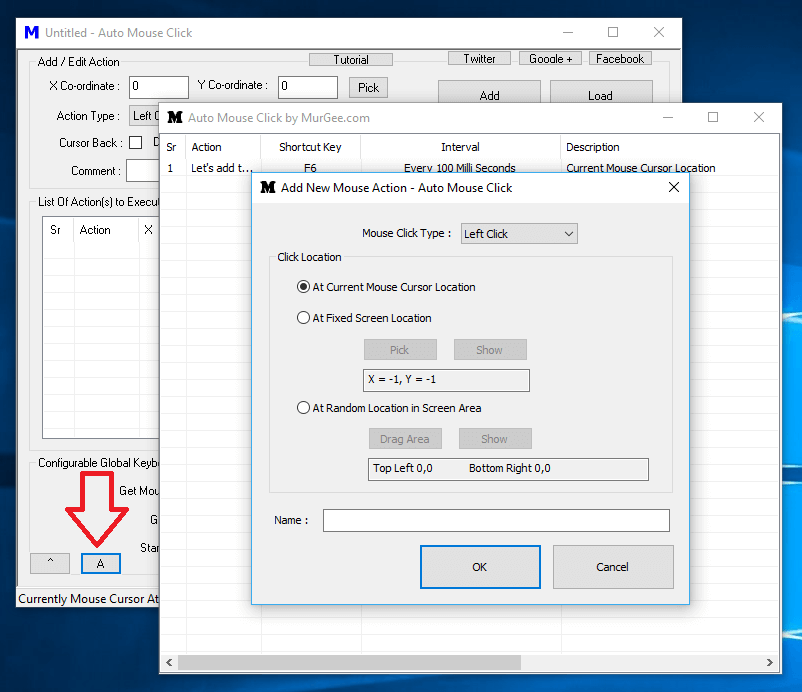
To get Started, open the Auto Mouse Click Software and use the Pick Button to add 2 Left Clicks. Using the Pick Button requires you to Click on the Pick Button and then click on the desired Screen Location. This process can be repeated to add another Left Click to the Script and can be virtually used to add as many Clicks to the Script as required. The post Add Macro Actions to the Script talks in detail about this process and is really easy to follow.
Once you have got 2 Left Clicks added to the Script, you need to assign a Keyboard Shortcut with which you can execute this Script which in turn will Execute all the Actions in the Script. The Steps required to Assign a Keyboard Shortcut to Start Execution of the Script are as follows:
- Do a Manual Mouse Click on the Last White Colored Box which has None written on it.
- Use the Keyboard to press a Keyboard Shortcut, let’s use F6 in this example.
- Click on Assign.
Once you have completed above steps, you can Minimize the Script Window and still press F6 to execute your Script. In case you do have a big Monitor or a Multiple Monitor Windows Computer, you can Move the Script Window outside the Clicking area and press F6 to Start Automated Mouse Clicking.
Advanced Auto Mouse Click Software with Advanced Mouse Clicking and Key Pressing Features
In this Example, first the Script will Execute Action Number 1 and then after the pre-defined time delay of Action Number 2, it will execute the Second Action. This is called as Synchronous Script Execution in which Macro Actions are executed in order so Number 1 Action gets executed first, then Number 2 Action and so on. In case you want Asynchronous Mouse Clicking at Multiple Screen Locations, you can use the Software Screen as displayed in the above Screenshot which allows you to Click at Multiple Screen Locations with individual Time Delay control.