Mouse and Keyboard Automation Software Tutorials
Here you can find Tutorials of a Windows Automation Software to Automate Mouse, keyboard and other Windows Actions with Auto Mouse Click by MurGee.com. Here you can find Screenshots displaying various Screens of this Mouse and keyboard Automation Software along with easy to follow steps to automate Mouse, Keyboard and other Windows Actions.
You can run Multiple Instances of Auto Mouse Click Application with each Instance loaded with a different Macro Script. Easiest way to launch multiple Instances of Auto Mouse Click is to double click on a Script File in Windows Explorer. Note in the screenshot below, 4 different scripts are loaded by 4 different instances of Auto Mouse Click Application. Each instance creates an Icon in Taskbar, although you can hide the Application Window and still use the assigned Keyboard Shortcut to execute appropriate Macro Script.
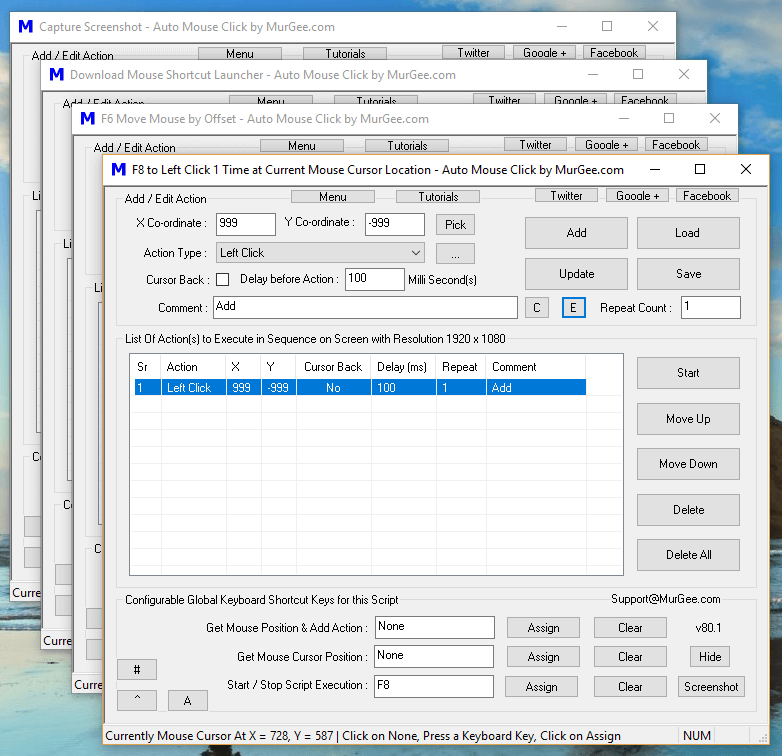
Multiple Instances of Auto Mouse Click
When you do have large number of scripts open, it can be a little bit cumbersome to remember each of the script and manage them. A quick way to manage multiple scripts is name each individual script appropriately and assign appropriate Keyboard Shortcut to execute the Script. You can use the Auto Mouse Click List Application to easily manage multiple scripts, hide any individual or multiple scripts and show them as and when required.
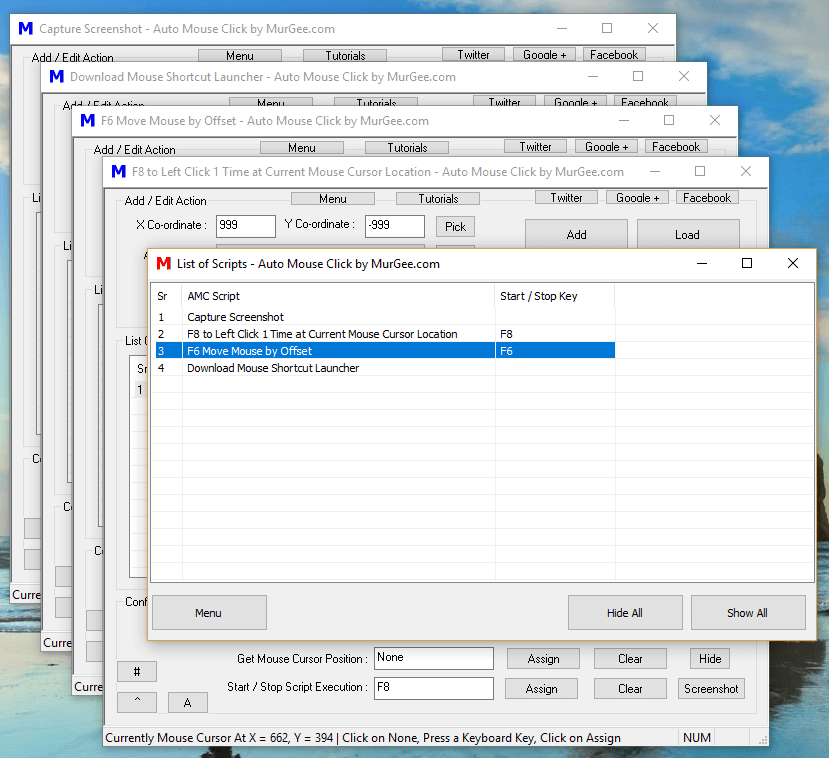
List of Auto Mouse Click Scripts
Hiding a Script removes it’s Auto Mouse Click instance from Taskbar, but the assigned Keyboard Shortcut still works. Yes Using Auto Mouse Click List Application is faster than using Profile Manager to Manage multiple Scripts as when hidden, the Macro Scripts are already loaded in memory and can be executed much faster than that done by Profile Manager.
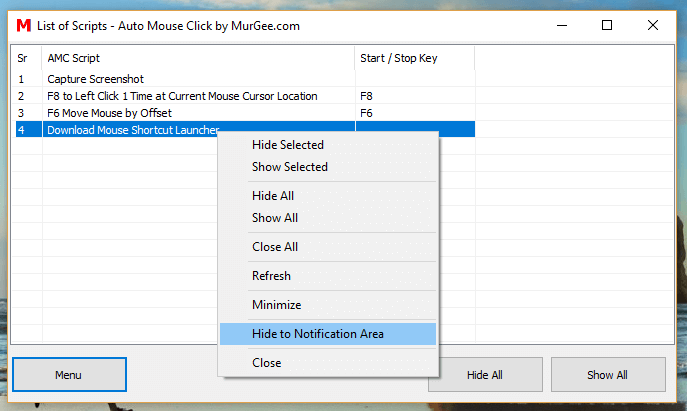
Hide Auto Mouse Click List Application to Notification Area
The Auto Mouse Click List Application can also be hidden in Notification Area and thus clearing up space in Taskbar. You can see the Auto Mouse Click Script Name and Keyboard Shortcut to Start / Stop the Macro Script Execution in the main application window of AMC List as displayed in the screenshot above.
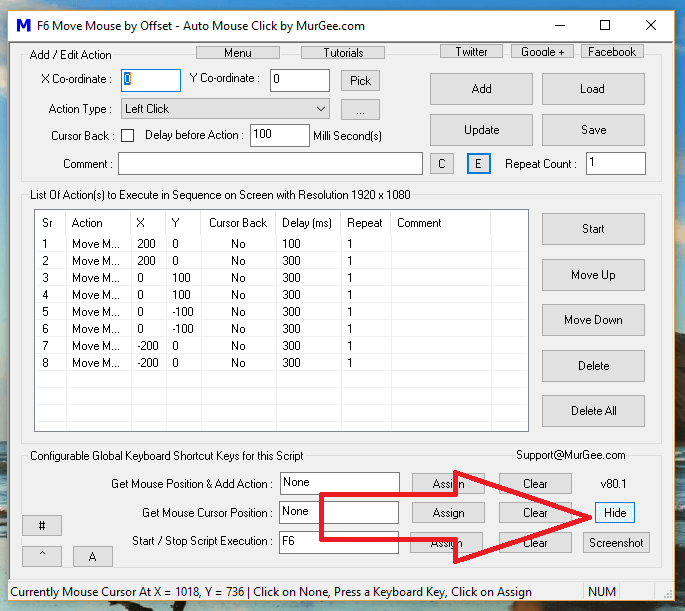
Hiding any running instance of Auto Mouse Click Application can be done by Clicking on the Hide button as displayed in the screenshot below. Yes you can also use the AMC List Application to hide / uhide Multiple Instances of Auto Mouse Click Application from the options provided in the Menu.
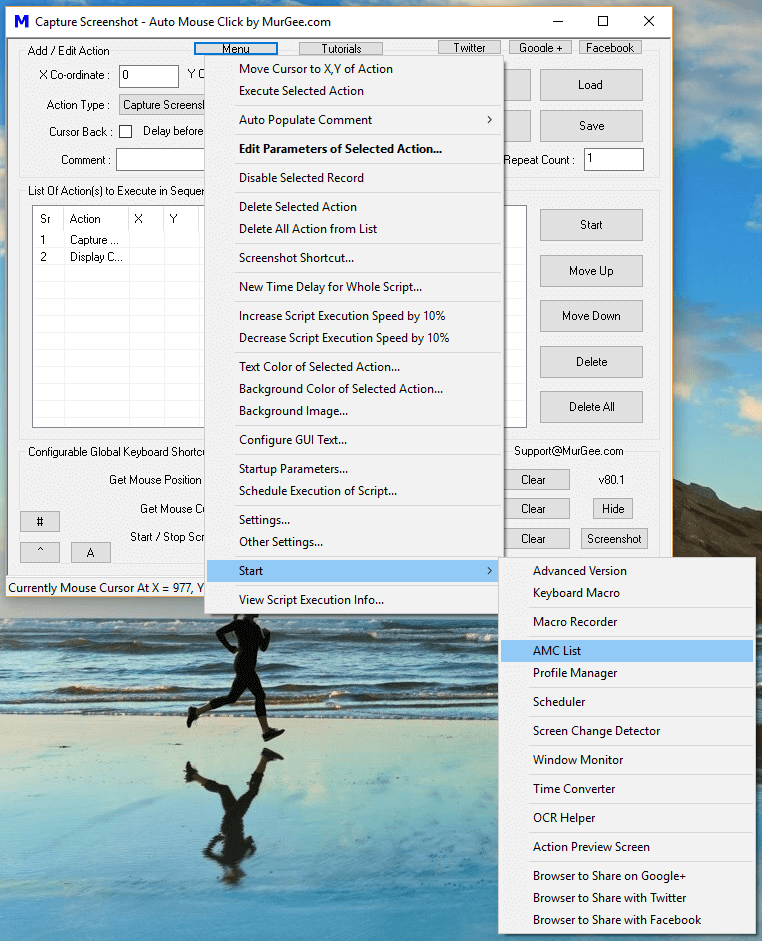
How to Use Auto Mouse Click List Application to Run Multiple Instances of Auto Mouse Click
Auto Mouse Click List Application is handy to use when you do have multiple instances of Auto Mouse Click Application Windows running. As mentioned in this post earlier, you can open multiple script from Windows Explorer or you can even simply launch Auto Mouse Click Application multiple times from Desktop Shortcut or from Programs menu Shortcut. Once you do have multiple instances of Auto Mouse Click Application running, you can use either of the methods mentioned below to launch AMC List Application :
Whenever you close AMC List Application, all the hidden Application Windows of Auto Mouse Click hidden will be shown automatically. In case you have relatively small number of Auto Mouse Click Scripts Open which you want to hide, just use the Hide Button on the Main Application Window of Auto Mouse Click which will hide the Script and will create an Icon in Notification Area from which you can unhide the Macro Script for editing / saving, etc.
This post talks about a built in Keyboard Macro Software which can be used in Games and other Applications whenever you want to record and playback keystrokes. The Keyboard Macro Application can be launched from the Menu as displayed in the screenshot of Auto Mouse Click Software below. The Keyboard Macro can be really handy for Games when you need to press multiple keystrokes multiple times. Yes this post will indeed provide step by step tutorial on how to use Keyboard Macro for Games and other Windows Applications.
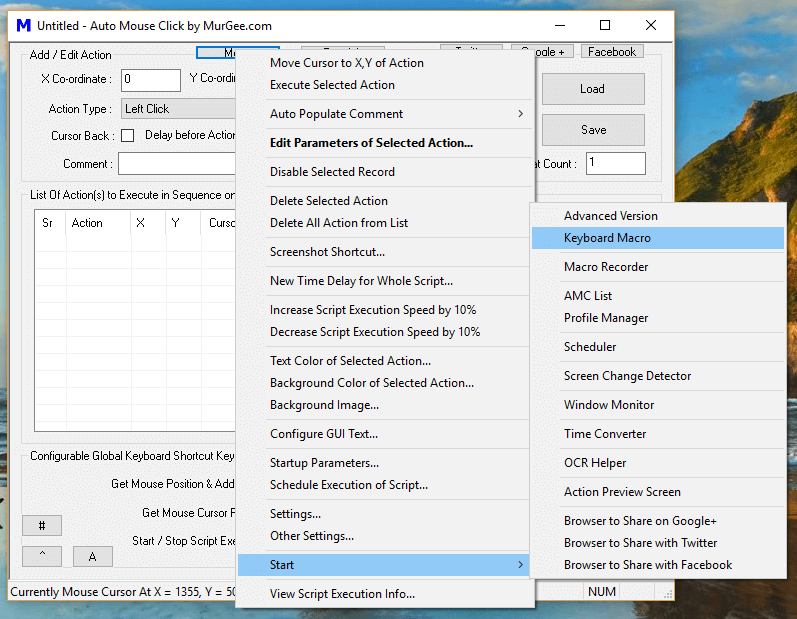
Launch Keyboard Macro Software from Auto Mouse Click Menu
Once you have located and launched the keyboard Macro Application as displayed in the screenshot below, you can either follow simple and easy to use interface to record keystrokes and play them back or read the the given below tutorial to understand and use the Keyboard Macro for Games or any other Windows Application which requires repetitive Keystroke pressing.
Keyboard Macro for Games
How to use Keyboard Macro in Games
The Keyboard Macro Software is really easy and handy to use and given below tutorial provides you step by step procedure to use the Keyboard Macro in Games or in any other Application which requires repetitive Keystroke pressing and releasing. You can even Edit any Keystroke recording and you can even edit to Keystroke Pressing and Keystroke Releasing level giving you full control over the time delay between consecutive Keystroke Actions.
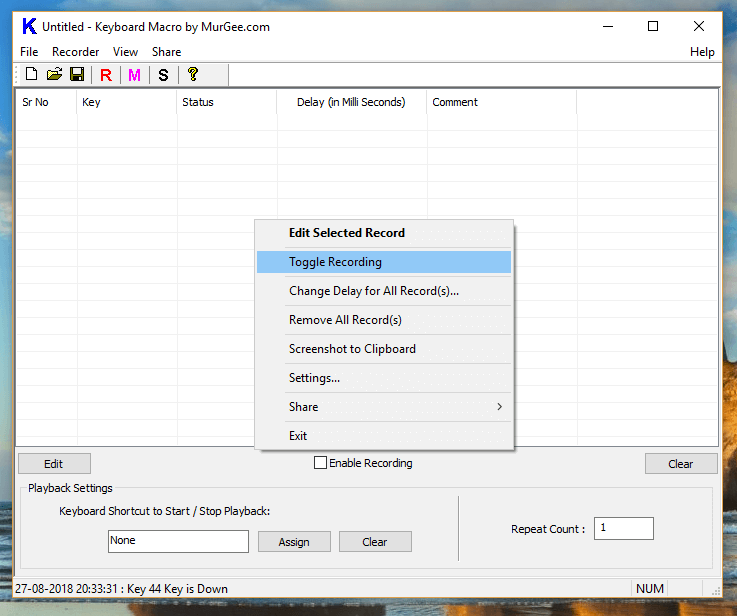
- Enable Recording from the Checkbox available on the Main Screen of the Keyboard Macro Software or use Right Click Menu as displayed in the screenshot above and Click on Toggle Recording.
- Now Press the desired Keystrokes, yes you can minimize Keyboard Macro Application or move it somewhere on the screen. Once you are done recording your Keystrokes , do stop the Keystroke recording from the Checkbox or from the Right Click Menu.
- Analyze the Recorded Keystrokes on the Main Screen of the Keyboard Macro Software. Yes you can launch the the Edit Screen to Edit Time Delay of any Keyboard Action which includes either Pressing the Keystroke Down or Releasing the Keystroke. This fine level of control gives you extreme control over the Keystrokes Simulated by the Keyboard Macro in Games or other Application.
- Now Assign a Keyboard Shortcut to Playback the recorded Keystrokes. Optionally you can also change the Repeat Count from 1 to any other number to repeat the Playback of all the Keystrokes Recorded.
- Test and Verify the Playback of Recorded Keystrokes in any Text Editor and only when you are completely satisfied with the Playback of Recorded Keystrokes, only then use the Keyboard Shortcut to playback the Recorded Keystrokes in Game of your Choice.
- You can also save the recorded keystrokes in a .KeyboardMacro File by clicking on the Save button. Yes you can load the recorded Keystrokes later from the saved .KeyboardMacro File.
Sample Keyboard Macro File
The given below screenshot displays a Keyboard Macro File containing few Keystrokes. Yes using the Keyboard Macro is really easy and straightforward. Since all the Recorded Key Presses and Key Releases are displayed in the Keyboard Macro Software itself along with Keyboard Shortcut to Play them back, it is really handy and easy to understand and use. Note in the given below screenshot, the Repeat Count has been set as 10 and the Keyboard Shortcut to play the Recorded Keystrokes has been assigned as F6.
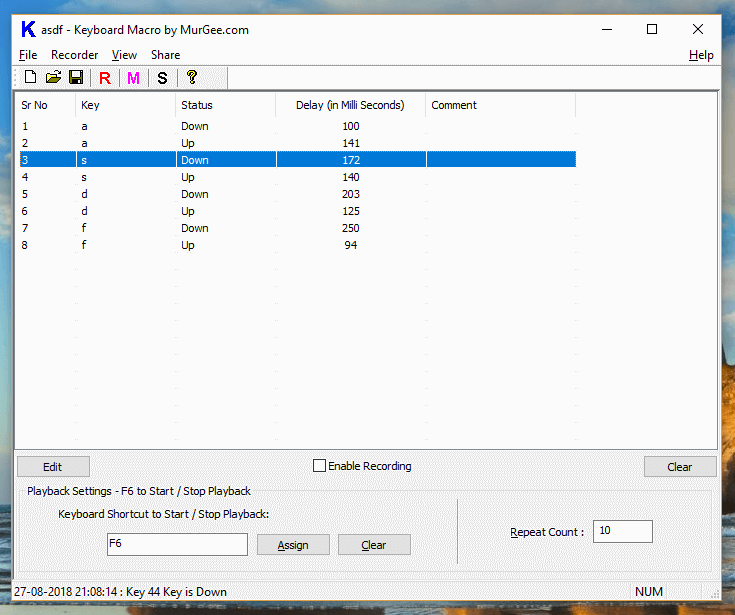
Sample Keyboard Macro File containing Recorded Keystrokes
With the above Keyboard Macro Data Loaded in the Keyboard Macro Software, whenever you press F6, the Keystrokes listed in the Keyboard Macro Application would be typed onto active Application Window in order and the whole sequence would be repeated 10 times. Yes everything is editable and you can even assign a comment to every keystroke so as to remember the purpose of any individual keystroke.
Apart from the Keyboard Macro Software, there are lots of other Keyboard Automation Actions available in the Auto Mouse Click Application which you can use to Automate any repetitive task. In case you do want to Record and Playback Mouse and Keyboard Actions from a Macro Script, you can use the Macro Recording Action and Record and Playback both Mouse and Keyboard Actions. This Keyboard Macro Software gives you fine control over Time Delay between Keystrokes and can be really useful in Games when precise control is required. With Keyboard Macro, Repetition of Multiple Keystrokes is really easy and fun in Online or Desktop Games.
Looping Auto Mouse Click Script execution is simple and easy and is done with the help of Repeat Count field of every Action. You can Loop a group of actions or even a single action in any script. To Loop a Macro Action or a Group of Macro Actions, you can use Repeat Count field. Given below are 2 ways in which you can utilize the Repeat Count Field to Loop 1 or Multiple Macro Actions.
- Use Repeat Count of any Action to Execute a Specific macro Action Multiple Times.
- Create another Script with Group of Actions and Execute it from the Main Script with the help of Launch and Wait Macro Action.
Looping a Single Macro Action
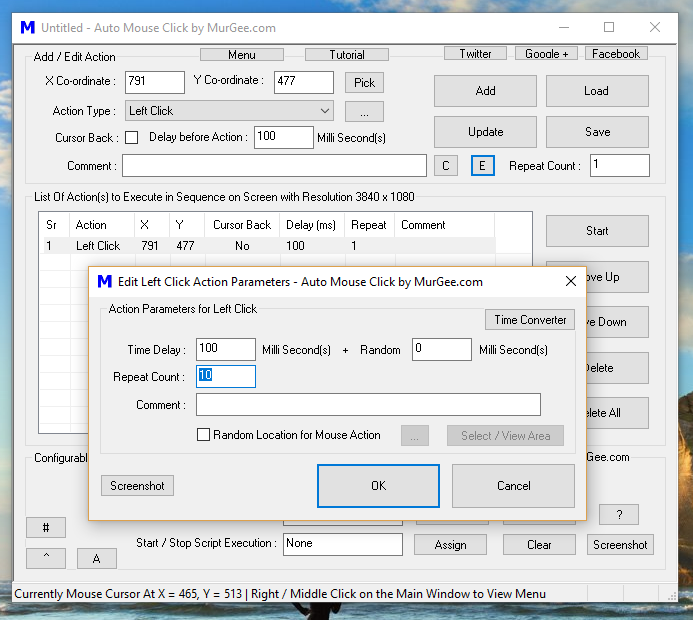
Double Click on any Macro Action to view Edit Parameters Screen where you can Edit Repeat Count of any Macro Action. The given below Screenshot displays Repeat Count Field highlighted and changed from default value of 1 to 10. Once you have specified Repeat Count value as required, you can click on the OK button to save the new Repeat Count for the selected Action.
Launch And Wait Macro Action
Instead of Double Clicking on any Macro Action in the Script to invoke Edit Parameters Screen, you can simply press the Keyboard Key Enter with your Keyboard to launch the Edit Parameters Screen. You can also press Esc Key to Discard Changes done in Edit Parameters Screen and Close the Edit Parameters Screen or Press Enter to Save Changes to the Macro Action and Close the Edit Parameters Screen.
Looping Group of Macro Actions
When you want to Loop a Group of Macro Actions, you can create another Script containing only the steps which you need to Repeat. Once you have created the required Sub Script containing the Macro Actions to Loop, you can call them with the help of Launch and Wait Macro Action from the Main Script.
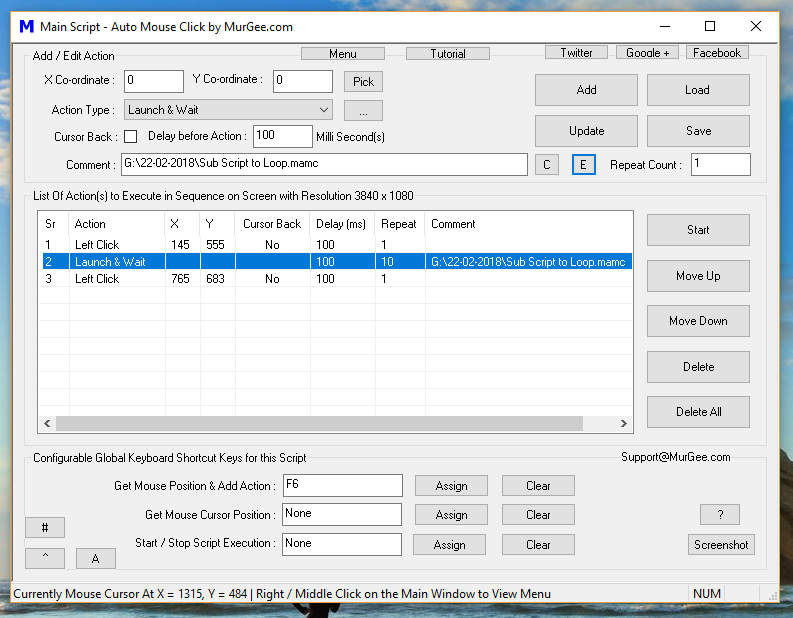
Auto Mouse Click Loop Group of Macro Actions
The above Screenshot Displays a Main Script which contains given below Actions:
- Single Left Click at X = 145 and Y = 555
- A Launch and Wait Macro Action to Execute another Sub Script 10 Times with the help of Repeat Count.
- Single Left Click at X = 765 and Y = 683.
Note that the Sub Script is being Looped containing whatever Actions it may Contain. With the help of Launch And Wait Action, you can also Execute other Applications and Open Document Files with their respective Applications. The post Launching Applications from Macro Script provides detailed usage of the Launch and Wait Macro Action.
Launch And Wait Macro Action
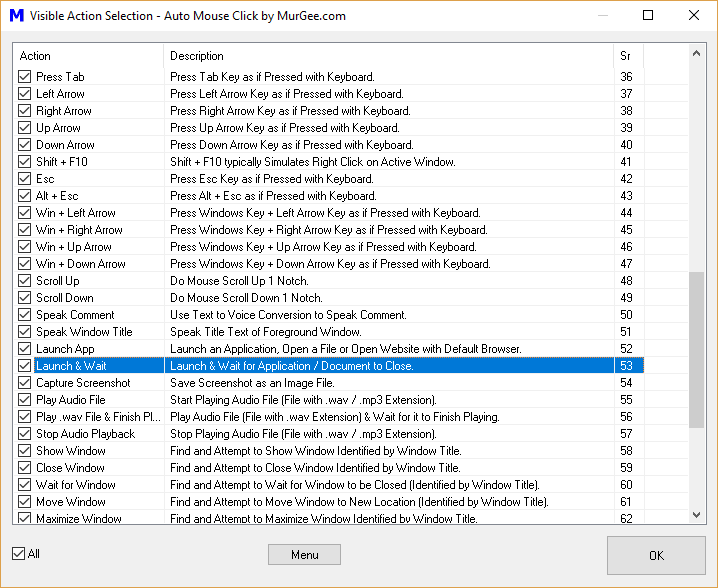
Just like any other Macro Action, you can View or Hide Launch and Wait Macro Action from the Visible Action Selection Screen as displayed in the Screenshot above. Depending on the purpose and usage of your Macro Script, you can also use Launch App Macro Action to Execute or even Loop Auto Mouse Click Macro Scripts, however the Launch App Macro Action will not wait for the Script Execution Initiated. With Careful Planning and understanding of Macro Action Repeat Count, Script Repeat Count and usage of Launch and Wait Macro Action, you can easily Loop Single or Multiple Macro Script Execution easily.
You can manage Multiple Auto Mouse Click Script Files with in built Profile Manager in Auto Mouse Click Installation. The Profile Manager can be launched from Desktop Shortcut or from Programs Menu Shortcut. As displayed in the screenshot below, you can add multiple macro scripts to the list using Profile Mane or with the help of Right Click Menu.
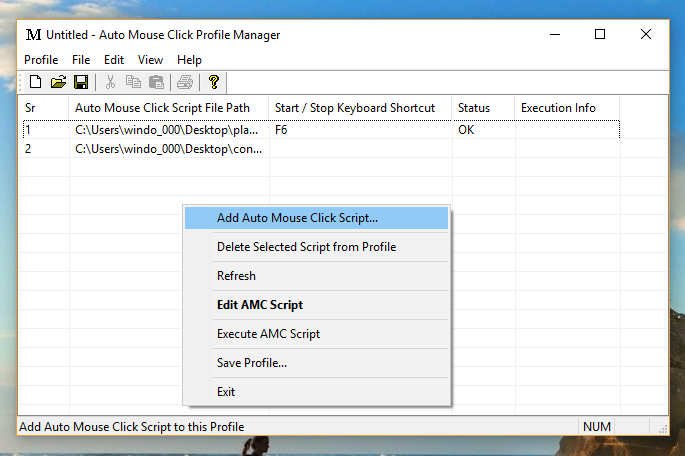
Manage Multiple Macro Scripts with Profile Manager
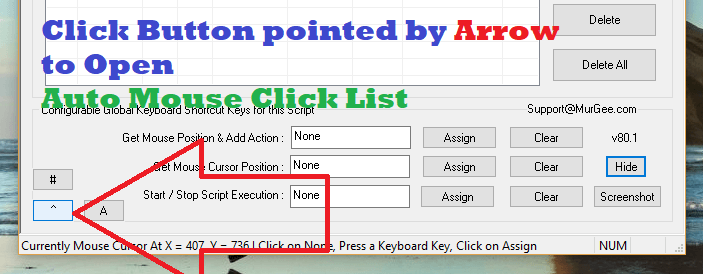
Once Multiple Macro Scripts are loaded into the Profile Manager, you can use the Assigned Keyboard Shortcut (assigned as described in the post How to Execute Macro Script) to Start / Stop Macro Execution to Start and Stop Macro Execution. The Keyboard Shortcut is Assigned in the Macro Editor as displayed in the screenshot below. Note the Screenshot below also displays an easy way to launch Profile Manager from the Menu invocable from the bottom left corner button.
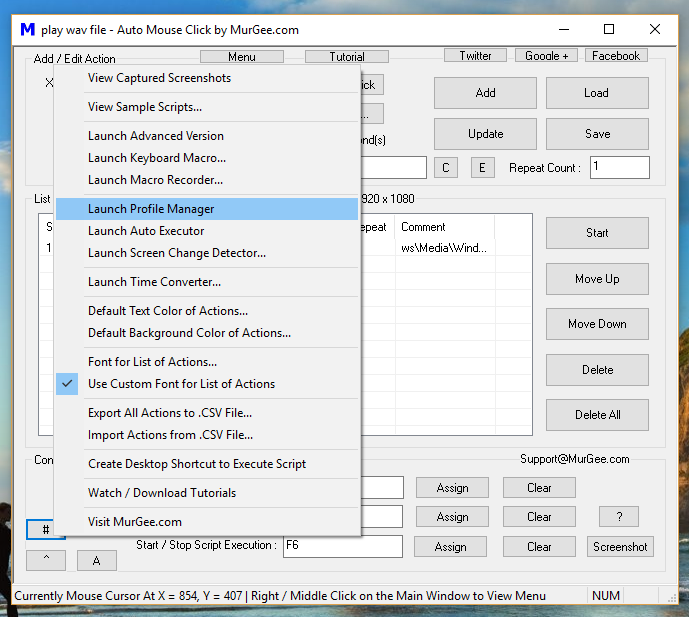
Launch Profile Manager from Menu in Auto Mouse Click
There are 2 Versions of Auto Mouse Click available which you can download and install as described below.
- Admin Version : This Version of Auto Mouse Click requires you to have Admin Access during Software Installation and works with all kind of Games, Applications and even with Applications launched with Admin Access. The Admin Version of Auto Mouse Click does not prompts of User Access Control (UAC) Prompts when it is run.
- Non-Admin Version : This Version of Auto Mouse Click can be installed without Admin Access on your Windows Computer and comes with a Mode Selector to select how you want to run Auto Mouse Click. Depending on the access of your User Account, you may or may not be presented with User Access Control Prompt (UAC).
When Running Admin Version, you do not need to answer User Access Control Prompt (UAC) and Profile Manager does not requires UAC Prompts as well. This Version is best suited for usage when you do have Admin Access to your Windows Computer during Software Installation.
When Running Non Admin Version, depending on the settings of Mode Selector, you may be presented with User Account Control Prompt. Note that Admin Version of Auto Mouse Click does not have Mode Selector as it is not required.
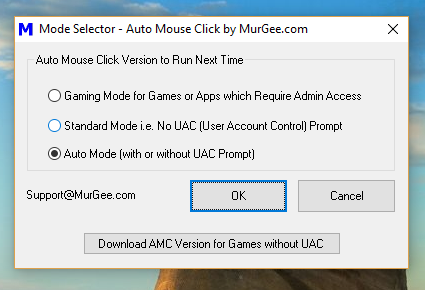
Mode Selector of Auto Mouse Click
The Admin Version is best suited when you are running Auto Mouse Click on a Gaming Computer or even a Personal Computer on which you do have Admin Access to your Windows Computer. On the other hand, the Non Admin Version of Auto Mouse Click is best suited for Office Computers on which you do not have Admin Access to Install a Software.
Since Profile Manager Executes Macro Scripts with Appropriate Version and Mode of Auto Mouse Click, you must understand above information and use the appropriate Mode / Version of Auto Mouse Click for best results and easy execution of Multiple Macro Scripts with Keyboard Shortcut. You can even Save and Load Multiple Macro Scripts Profile with Profile Manager for easy Management of Multiple Macro Scripts.
Now you can Automatically capture Screenshot of any Window, Primary Monitor, All Extended Monitors in a Multi Monitor Computer or Rectangular Screen Area as displayed in the screenshot below. Capturing Screenshot can be an easy way to Monitor an Application performance over a long time duration when you want a Macro Script to run unattended for a while. The Captured Screenshots can be stored as PNG File, BMP File or even a JPG File by selecting Image File Type as displayed in the screenshot below.
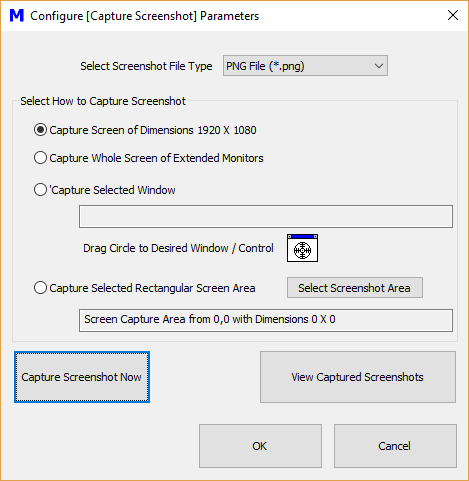
Automatically Capture Screenshots with a Macro Script
The Capture Screenshot Macro Action is available for Selection in the Macro Action Selection Screen as displayed below. This Macro Action is enabled by default and can be added to any Macro Script just like any other Mouse Clicking, Key Pressing or Window Automation Action. To Configure Capture Screenshot Macro Action, parameters, double click on the Macro Action in the Script to view the settings / parameters available for the Macro Action as displayed in the screenshot above.
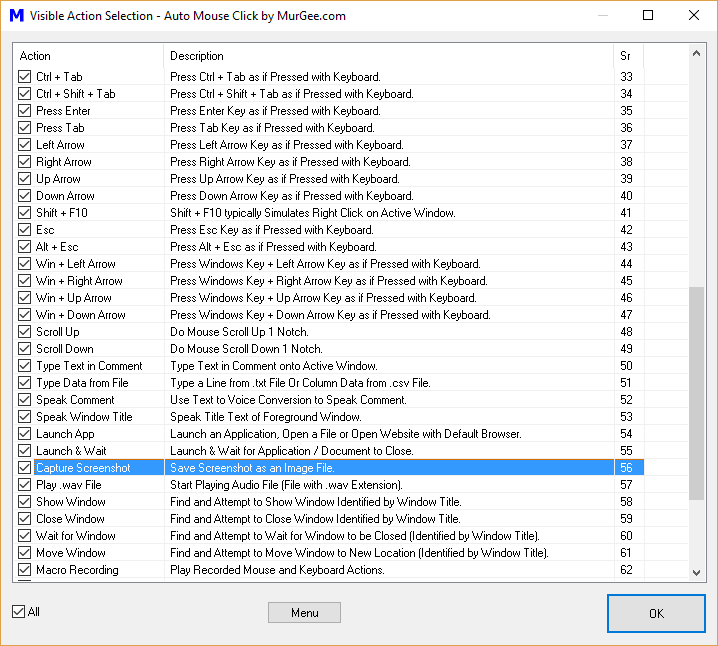
Capture Screenshot Macro Action in Macro Action Selection Screen
For All Actions which have configurable parameters available for an action in the script, an informational message is displayed to inform about the extra parameters. When you add the Capture Screenshot action in the list of actions in the Macro, you will see an information message displaying information on what to do next as displayed in the screenshot below. When you are comfortable with the Capture Screenshot Action, you can disable the information message popup from Settings of this Windows Automation Software Application.
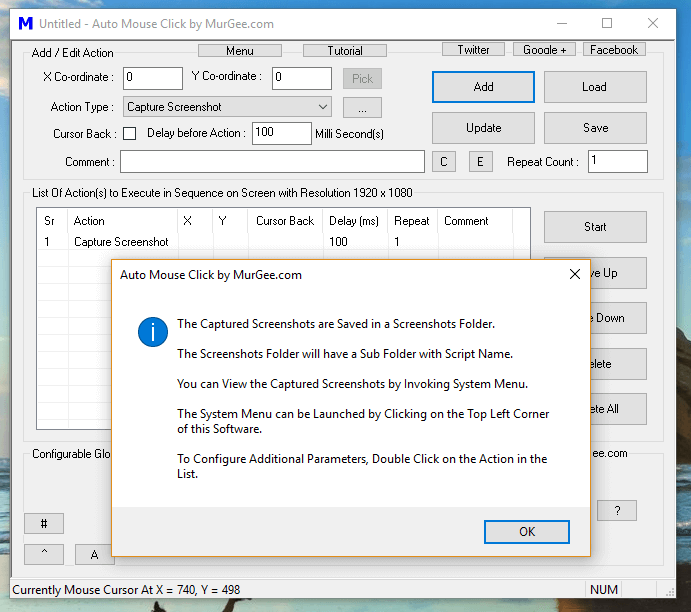
Capture Screenshot Action in the Macro Script
All the Captured Screenshots are stored in a folder named as per the current script name and can be easily opened. When you capture Screenshot of a Window, the Screenshot file name is created by combining Window Name and current Date / Time. When capturing Screenshots of Screen Area or even Primary / All Monitors Image, the file name created is by creating a file name with Date and Time at the time of Screenshot Capture.
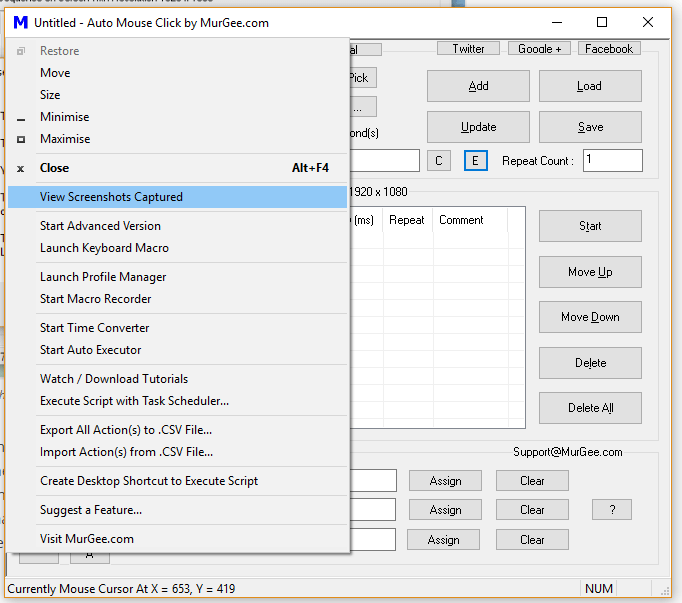
View Screenshots Captured by Macro Script
You can add the Capture Screenshot Action in any Macro Script and the Captured Screenshots will be captured automatically whenever the Macro Script is executed. You can view all the captured Screenshots from the System Menu as displayed in the screenshot above. The Hard Disk space required to store Screenshots depends on the parameters you select for the Capture Screenshot Macro Action. Do use the Capture Screenshot Macro Action to Monitor any Application, Game or Whole Computer Screen easily with a Macro Script with Capture Screenshot Macro Action.
Welcome to the Best Auto Mouse Clicker page where you can find all the information required to Automate Mouse Clicking, Keystroke Pressing and everything else which requires lots of human efforts. The Software presented here is Auto Mouse Click which can do Repetitive Mouse Clicking with configurable time delay, configurable sequence of Mouse Clicks, can Click in Games and can do much more. This is definitely the Best Auto Mouse Clicker Application which lets you create a Mouse Clicking Script and run it as many times as you want. This Mouse Clicking Application has become better and better with inputs from users and has been developed to the highest possible software standards.
Best Auto Mouse Clicker
This Best Auto Mouse Clicker supports all types of Mouse Clicking (e.g. Left Click, Middle Click, Right Click, Double Click, Ctrl + Click, Shift + Click, etc), Mouse Movement (Mouse Movement with Animation, Mouse Movement by Offset or Direct Mouse Movement from one Screen Location to other) and much more. The post Mouse Automation Actions talks in details about the Mouse Automation Actions supported by the Software. Yes there are other Mouse Clicking Actions and other features are being continuously being added to the Software. All the Mouse Actions including Mouse Movement Actions are basically macros which can be run from within the script and have been planned carefully with utmost care.
Auto Mouse Mover and Clicker
One of the main reason due to which this Software has been rated as Best Auto Mouse Clicker is its usability in various fields, Whether you want to get a helping hand in a Game to do repetitive task, copy some data from a spreadsheet to webpage, Automate any existing Windows Application or anything else, with careful planning you can Automate almost everything within a few minutes. Another reason due to which this Application is definitely the Best Auto Mouse Clicker is the fact that it is really easy and simple to use and anybody with basic knowledge of Windows can understand how the software works and can be put into use to Automate Repetitive Mouse Clicking at one or multiple screen locations identified by Screen Co-Ordinates.
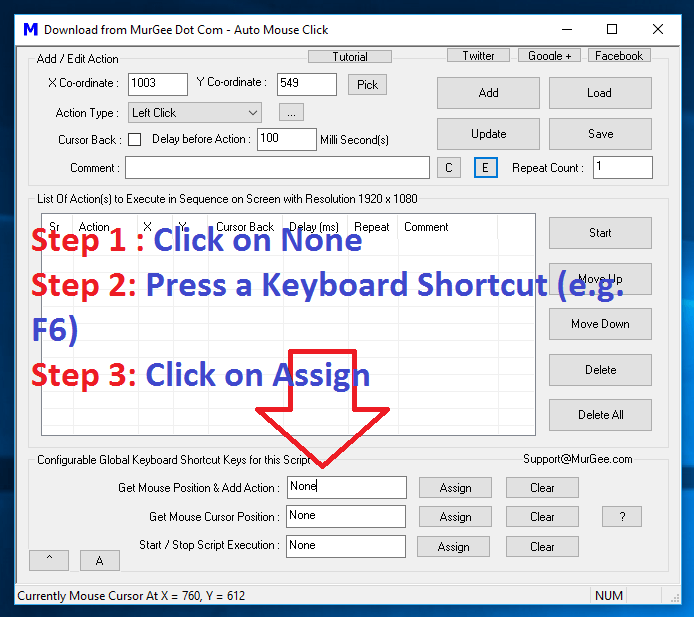
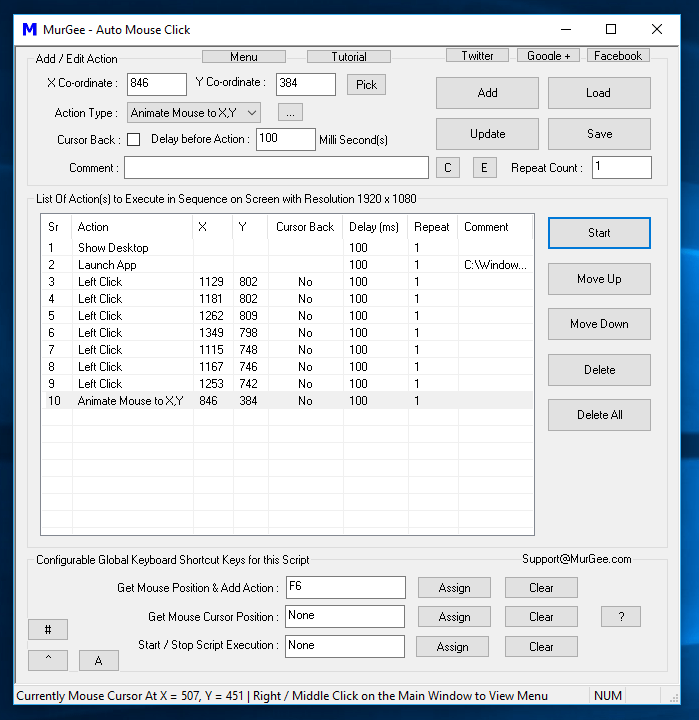
Assign a Keyboard Shortcut to Read Screen Location under Mouse Cursor and add a Macro Action to the Macro Script
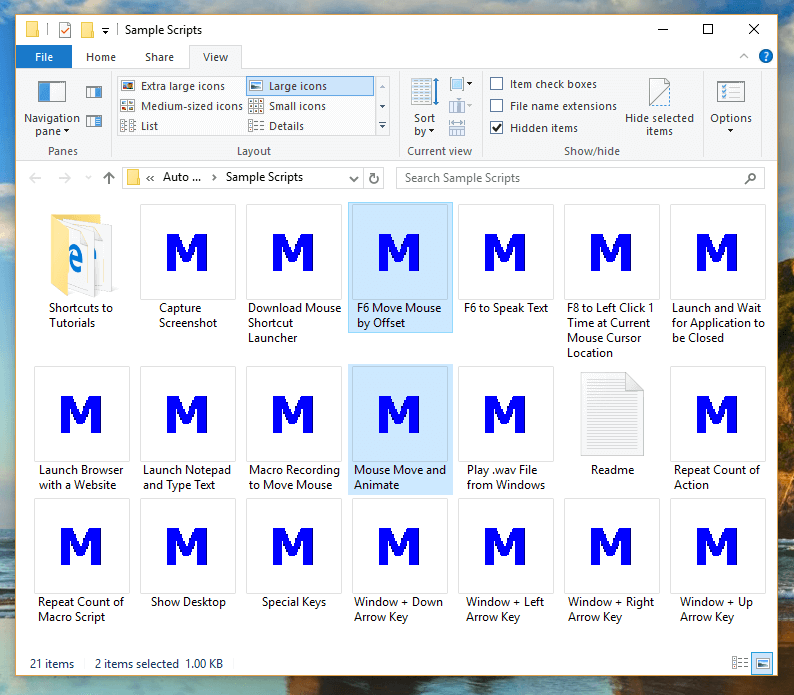
As displayed in the Screenshot above, you can assign Keyboard Shortcuts to Pickup Screen Co-Ordinates and Control Playback of Mouse Clicking Actions. Yes there are sample scripts installed as part of Software Installation and you can Double Click on any of them to view the Script and Execute them to learn this Auto Mouse Click Software. Yes there are Video Tutorials available as well which you can use to speed up you learning. Apart from Free Sample Scripts, Video Tutorials, you can use this blog to look for specific functionality like Macro Recording and Playback to Record and Playback Mouse Clicking, Mouse Movement, Keystroke Pressing, MMOPRG Gaming Mode to Automate Mouse Clicking in Full Screen Games etc.
Mouse Clicking and Mouse Movement Sample Macro Scripts
You can Download and Install this Mouse Clicking Application for Free and quickly start using this Application to Automate Repetitive Mouse Clicking. As this is a try before buy Application, you would need to pay a small registration fees at the end of the software trial to keep on using this Mouse Clicking Application. This Mouse Automation Application works on Windows 10, Windows 8.1, Windows 11 and other Microsoft Windows Operating Systems running 32 bit or 64 bit Architectures.
Auto Mouse Click Macro Actions in Macro Script for Mouse Automation
We have spent years in developing this Software Application and have tried our best to make it the Best Auto Mouse Clicker Application which is easy to use, free to try and cheap to buy. With Support from our users who sent us feature suggestions, bug reports and with appropriate communication, we have improved features of our Software Application so that they are useful in Gaming, Data Management, Repetitive Browser tasks, etc. Yes you can send in your feature request or suggestion to Support@MurGee.com and get your requested feature implemented for free. Please do make sure to tell you friends about this fantastic Mouse Clicking Application which can do much more than Mouse Clicking for you.
There are multiple ways supported by this Mouse Automation Utility in which you can Move your Mouse Cursor around your Computer Screen. Mouse Movement across the Screen can be controlled by understanding the 2 dimension co-ordinates of your Computer Screen. Mouse Cursor Location is identified by X and Y co-ordinates and origin of the 2 dimension Screen co-ordinates start at the top left corner of primary monitor. Given below are the ways in which you can Move Mouse Cursor from a Macro Script.
- Move Mouse to a pre-defined Screen Location instantly identified by Screen X and Y Co-ordinates.
- Move Mouse Cursor by offset or relative Mouse Movement where you can specify by how much Pixels your Mouse Cursor is moved in Horizontal and / or Vertical Direction.
- Animate Mouse Cursor Movement to a pre-defined Screen Location identified by Screen X and Y Co-ordinates. The Mouse Cursor Movement Animation is configurable is is documented at Animate Mouse Movement post of this blog.
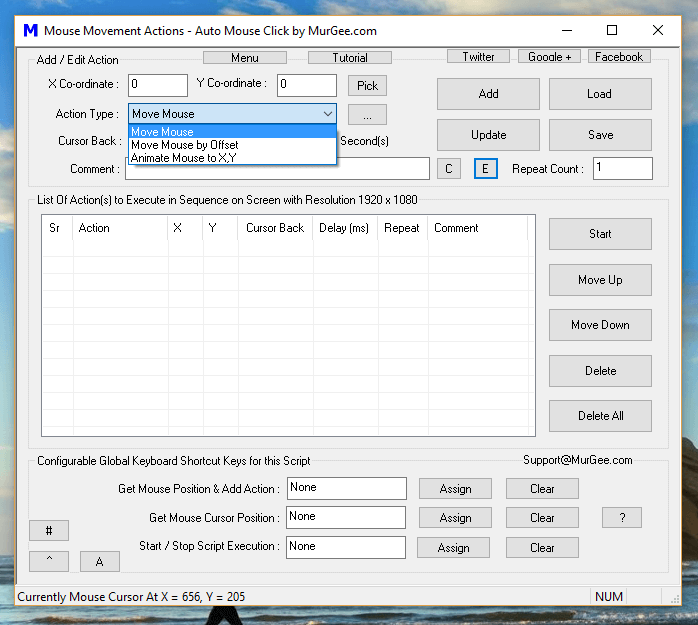
Mouse Movement Macro Actions for the Script
Apart from above mentioned Mouse Movement Macro Actions, all the Mouse Automation Actions support bringing Mouse Cursor back to it’s original Screen location with the help of Cursor back Checkbox. All the Mouse Clicking Actions do allow you to specify Screen X and Y Co-ordinates and Mouse Movement in all these actions is done instantly without any delay.
With Auto Mouse Click Application running, you can easily understand Screen Co-Ordinates by moving your Mouse Cursor to top left corner of your Primary Monitor and reading the Screen co-ordinates from the Status bar of the Application window as displayed in the screenshot above. Even when you have multiple Monitors connected to your Windows Computer, the origin of Screen co-ordinates start at the top left corner or your Primary Monitor. In case of Multiple Monitor Windows Computer, depending on your Virtual Desktop configuration encompassing all the Monitor(s), the X and Y co-ordinates can have positive or negative values.
Mouse Movement Macro Scripts
Above Screenshot displays Sample Mouse Movement Scripts available in the installation folder. Note that one Sample Script displays how you can Move Mouse Cursor by offset or in other words, displays how you can move Mouse Cursor from current Mouse Cursor Location to let’s say 50 pixels in horizontal direction and 100 pixels in vertical direction. In order to understand the Mouse Movement by Offset, just double click on the sample script and start script execution to view Mouse Cursor Movement around current Mouse Cursor Location. Another Mouse Animation Script Example is present in the samples folder which Animates Mouse Cursor from top left corner of your Primary Monitor to another pre-defined screen location.
Auto Mouse Mover to Move Mouse Cursor
When you want to Move Mouse Cursor without writing a Script or Macro, you can use Auto Mouse Mover Application which is really easy and straightforward to use. The given below Screenshot displays the main screen of the software and allows you how and when you want to move your Mouse Cursor Horizontally or Vertically. This can be really handy when you want to Keep your Windows Computer Awake during a large file download or upload.
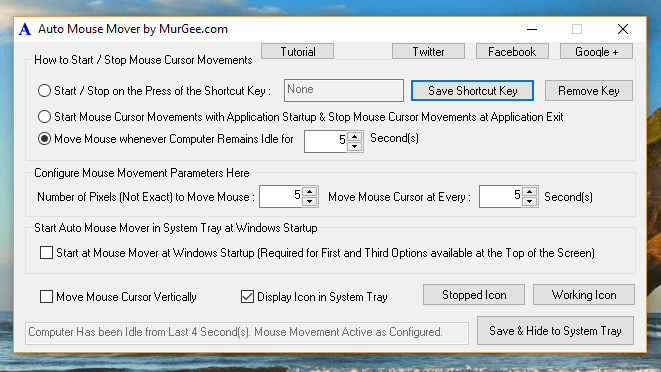
Auto Mouse Mover
There is no need to write a Macro Script to Move Mouse Cursor when using this Application, however it is available for a specific purpose and it serves it’s design process very well. This Mouse Cursor Moving Application ensures continuous Mouse Cursor Movement without disturbing your usage of Physical Mouse Cursor. As displayed in the Screenshot above, it can wait until the Computer is Idle or Inactive and only then Move Mouse Cursor to Keep your Windows Computer awake or active.
Automated Mouse Cursor Movement
The Software Applications presented above can be used to Automate Mouse Cursor Movement as required. Whether you want to show an Automated Presentation in which your Mouse Cursor Automatically Moves to pre-defined Screen Location with or without Animation, you can simply create a Macro Script and execute it with a keyboard or even a Mouse Shortcut. The Second Application presented in the above post provides Automated Mouse Movement so as to keep your Windows Computer awake for as long as you want.
Both of the above mentioned Mouse Automation Software Applications presented are available on a Free to Download and try basis. Once the Free trial usages have been used, you would be requested to pay a Software Registration fees. Yes both of the applications do work on 32 bit and 64 bit Microsoft Operating Systems including Windows 11, Windows 10, Windows 8.1, Windows Server 2022, etc. Automated Mouse Cursor Movement is now really easy and controllable. These Applications can indeed save you lots of time and efforts and yes can give your hand and fingers a rest.
When you want to monitor some Screen Area and execute a Macro Script, you can use Screen Change Detection features of this Automatic Mouse Clicking Utility. Whether you want to have an audible alert when Screen Changes or whether you want to launch an application or program or even do Automated Mouse Clicking, you can Automate Screen Change Detection easily with the Software Application presented here. Whether you want to detect sprites in a Game, Monitor a Software for Color Changes or anything that visually changes appearance, you can easily Monitor your Screen and Execute a Macro Script to Automate Mouse Clicking, Launch Application, Open a Document File, Close an Application, Sound an audible alert or any other Windows Automation Task.
Auto Screen Change Detection
The Automatic Screen Change Detection Software presented here monitors a rectangular area and allows you to execute a Macro Script when the change in the defined rectangular area is within specified limit. Monitoring a Pixel Color can be an alternative, but this Percentage Change in Screen Area allows you to visually plan what must happen when your defined screen area changes. Given below are the steps required to successfully Monitor a Rectangular Screen area:-
- Create a Macro Script to be executed when your Screen Changes. Test the Script to ensure that Script does performs all the actions required for a particular task.
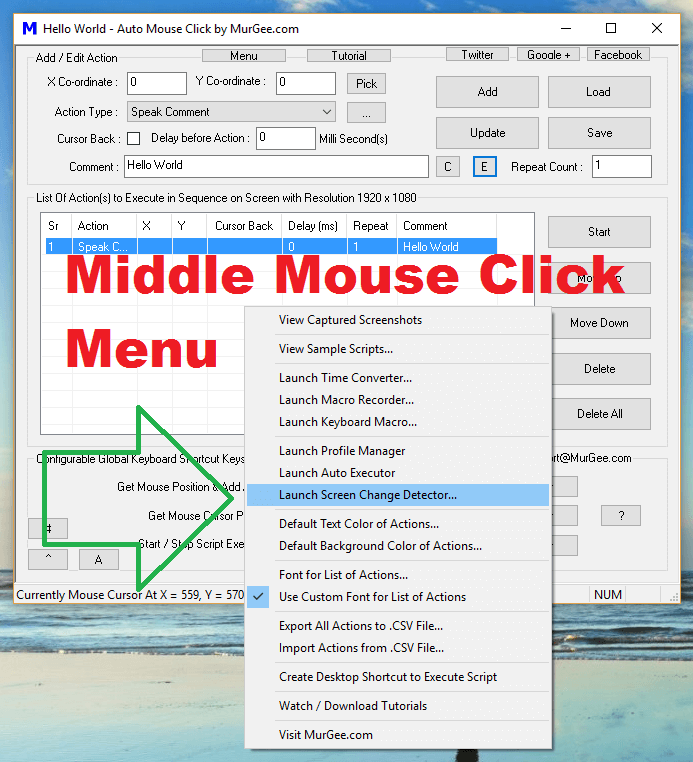
- Now Middle Mouse Click on the Main Screen of the Software as displayed in the Screenshot above to open Middle Mouse Click Menu and select Launch Screen Change Detector.
- The Screen Change Detector Menu launches an Application which is named as Auto Mouse Click Script Executor as displayed in the Screenshot below.
- Carefully analyze the Screen Change Detector Software and then click on the Capture Screen Area button to select the Rectangular Screen Area which you wish to Monitor. Once you have defined the Rectangular Screen Area to be monitored, you can view the Captured Screen Area or even Save the Captured Screen Area as an Image.
- Now Click on the button Start Monitoring to Monitor the Screen Change in percentage. In order to ascertain the percentage change in Screen Area, change the defined Screen Area by either Clicking, Hiding or Overlapping the underlying Game, Application or Browser Window.
- When you hand understood by how much percentage your Screen Area Changes, Enable Auto Execute and define the Percentage Range of Screen Change and finally Click on Start Monitoring to let this Screen Monitor Software Execute Macro Script whenever your Screen Area Changes.
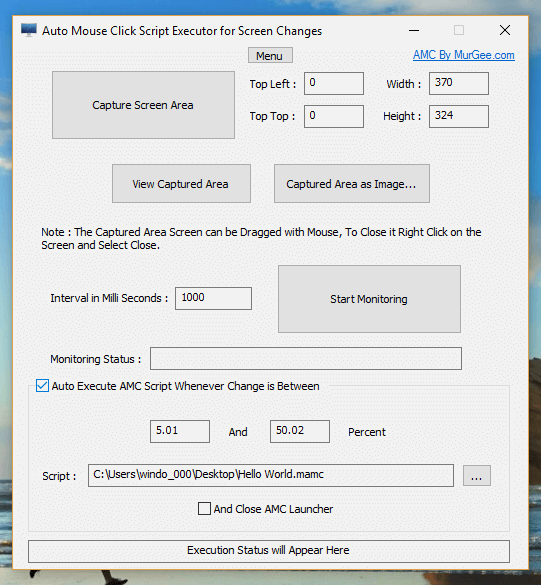
Screen Change Detector Software
This Method of Screen Change Detection is much better than Pixel Change Detection and allows you to control and configure wide range of Screen Change Detection. This Method of Screen Change Detection executes a stand-alone Macro Script and all the Action(s) to be executed must be present in the Script. There is another Image Search built in Macro Action which can be run from within a Macro Script.
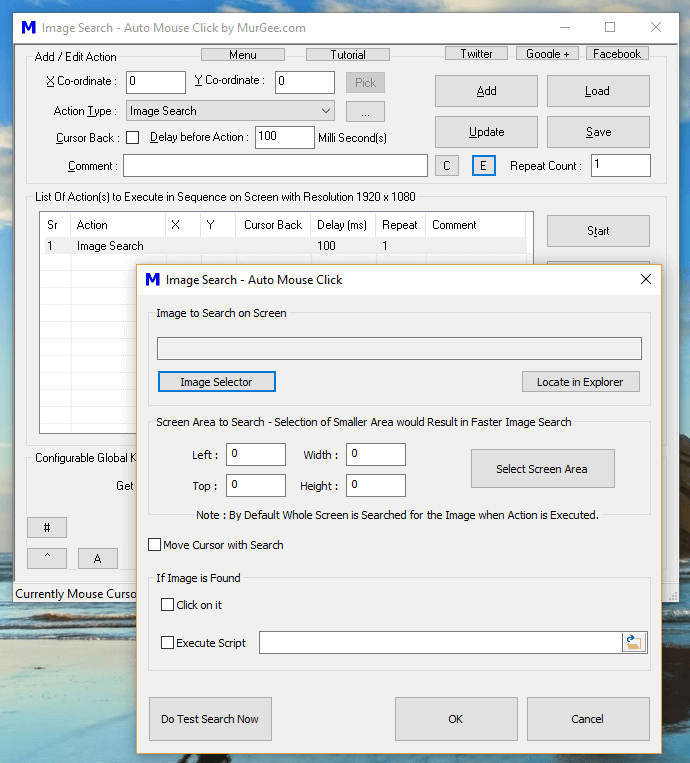
Image Search Macro Action
The Screenshot above displays the Image Search Macro Action which is a different way of Macro Script Execution as compare to Monitoring Screen Changes. This Image Search allows you to Search a specific Image on your Computer Screen. The Image Search Area is configurable and can encompass whole Screen Area of a Small Portion of Screen Area. Once an Image is found on the Screen, you can either simulate a Mouse Click on it or execute a Macro Script or even launch another Application or open a Document of any Registered Application.
All Macro Actions of Auto Mouse Click available for Automation
With understanding of appropriate Screen Change Detection features described above, you can create Simple Screen Change Sound Alert System, Monitor Color Changes on your Screen done by an Application or a Game and avoid Sitting in front of your Computer and waiting for changes on your Screen. Script Executed due to Screen Changes can Automate Mouse, Automate Keyboard, Launch Applications or Automate other Windows Tasks.
Now you can execute Auto Mouse Click Script with the help of Mouse Buttons by using them as Mouse Shortcuts. A New Application has been launched and is being provided to Auto Mouse Click Application Users allowing them to use Mouse Down or Mouse Up Actions to execute a Macro Script. As of now in total 6 Mouse Actions can be programmed as mentioned below
- Left Mouse Button Down
- Left Mouse Button Up
- Right Mouse Button Down
- Right Mouse Button Up
- Middle Mouse Button Down
- Middle Mouse Button Up
You can assign any of the above mentioned Mouse Actions to execute Macro Script with Launcher for Auto Mouse Click by MurGee.com whose Screenshot is as displayed below. Note than if you would like to Assign Keyboard Shortcuts to Multiple Macro Scripts, you can use Profile Manager which allows you to easily manage Multiple Macro Scripts along with their Keyboard Shortcuts.
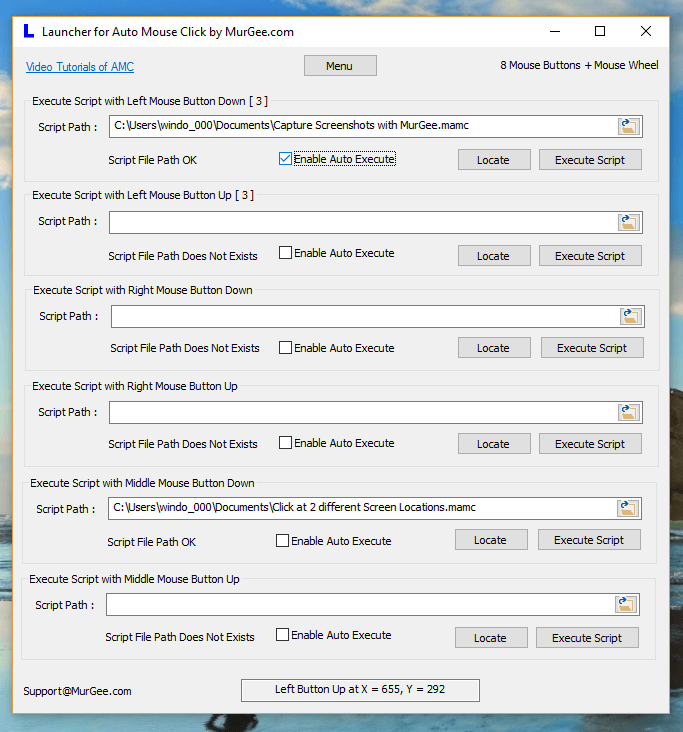
Mouse Shortcut to Execute Auto Mouse Click Script
The above Screenshot of Launcher for Auto Mouse Click displays how you can assign Macro Scripts to individual Mouse Actions. In order to enable Automatic Script Execution with Mouse Action, you would need to enable Appropriate Auto Execute Checkbox as displayed in the screenshot above. Note that Automatic Script Execution has been enabled for Left Mouse Button Down, however for Middle Mouse Button Down, the Auto Execute Checkbox has been been enabled to distinguish the Automatic Script Execution Demonstration.
Launcher for Auto Mouse Click by MurGee on Windows 10
This Mouse Button Software requires extra Software Installation, however it is totally free to use and does not require any payment. Download this Free Software and assign Mouse Shortcuts to execute Macro Scripts. The above Screenshot displays the Launcher Software installed on a Windows 10 Computer, however it does works on other Windows Operating Systems like Windows 7, Windows 8, Windows 8.1, etc.
When you do not want to use Mouse Shortcut(s) to execute Macro Script(s), you can simply close the Launcher for Mouse Buttons and Scripts will not Auto Execute with Mouse Action(s). Using Mouse Button(s) to execute Macro Script(s) can be really handy when you have unused Mouse Button(s) in a Game or when you do not want to use Keyboard to launch Macro Script(s). You can also use this Mouse Button(s) Software to simply execute the Macro Script(s) without enabling Mouse Button Shortcut(s).
Now you can Record and Playback Keystrokes easily with Keyboard Macro Software. This can be really handy when you want to automate specific keystrokes multiple number of times. Each Keystroke is composed of Key Down and Key Up, however combination keystrokes like Ctrl + W, Ctrl + Shift + T etc require more number of keystrokes and each individual keystroke requires 2 Keyboard Actions and all is managed by the Keystroke Recorder and Player.
Keyboard Macro Recorder and Player Menu in Auto Mouse Click Software
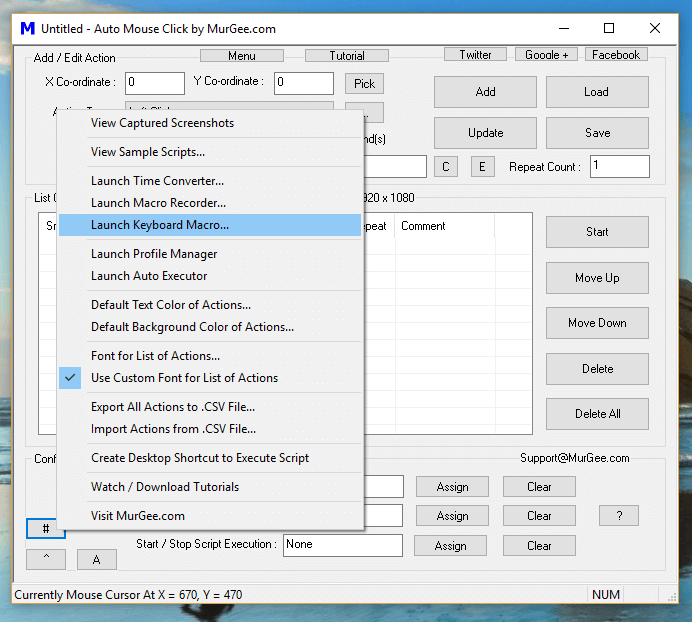
The above Screenshot displays how you can launch Keyboard Macro Software from the button Menu present on the Main Screen of the Software. Overall there are 3 ways in which you can launch the Keyboard Macro Software as enumerated below
- Click with Middle Mouse Click on the Software to view a Menu containing a Menu Item allowing you to launch Keyboard Macro Software.
- Click on the Top Left Corner of the Software’s Main Screen which invokes System Menu having a Menu Item to launch Keyboard Macro Software.
- Click on the # button on the Main Screen of the Software as displayed in the above Screenshot and click on Launch Keyboard Macro.
When you have launched the Keyboard Macro Software, you can Record and Playback Keyboard Macros easily. Do have a look at the given below screenshot of the Keyboard Macro Software. All the Controls and features of the Keyboard Macro Software are self explanatory and you can get started right now without requiring any tutorial. The Keyboard Macro Software has a Recorder on the top area of the Software and Keyboard Macro Player at the bottom allowing you to use a Keyboard Shortcut to Start or Stop Keyboard Macro.
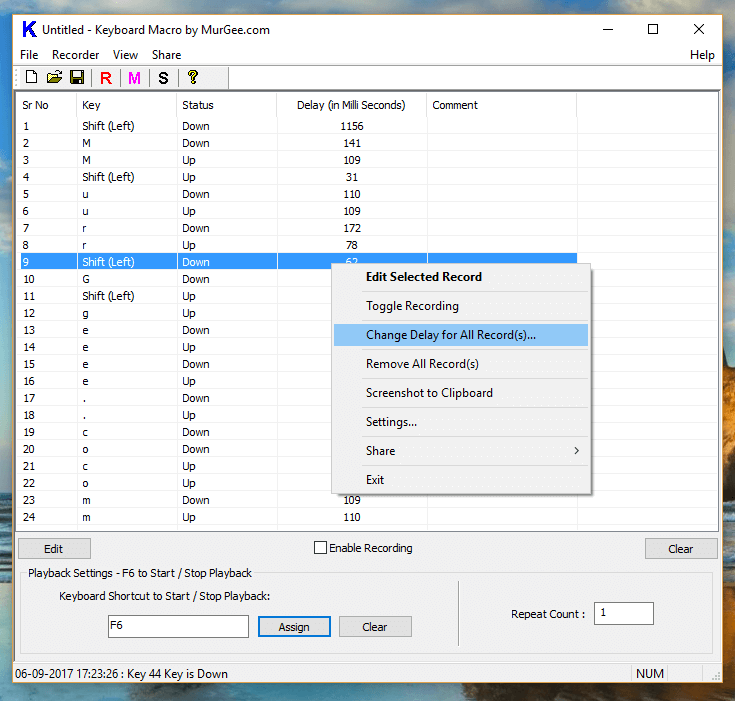
Keyboard Macro Recorder and Player
Note in the above Screenshot that a few Keystrokes have been recorded and a Keyboard Shortcut F6 has been assigned to Start / Stop Playback of the Recorded Macro. Note that you can specify Repeat Count to be more than 1 to Playback the recorded Keystrokes multiple times. The Keyboard Macro Software’s Main Screen is re sizable and remembers it’s position and size. Yes, you can even save the recorded Keystrokes to a Data File and Execute the Data file from the Auto Mouse Click Script with the help of Launch App Action. The Given below Screenshot displays how you can execute a Keyboard Macro from the Script. This Keyboard Macro has the advantage of allowing you to Edit Time Duration between Keystrokes, however if you do want to Record and Playback Mouse and Keyboard Actions, you can use Macro Recording Action.
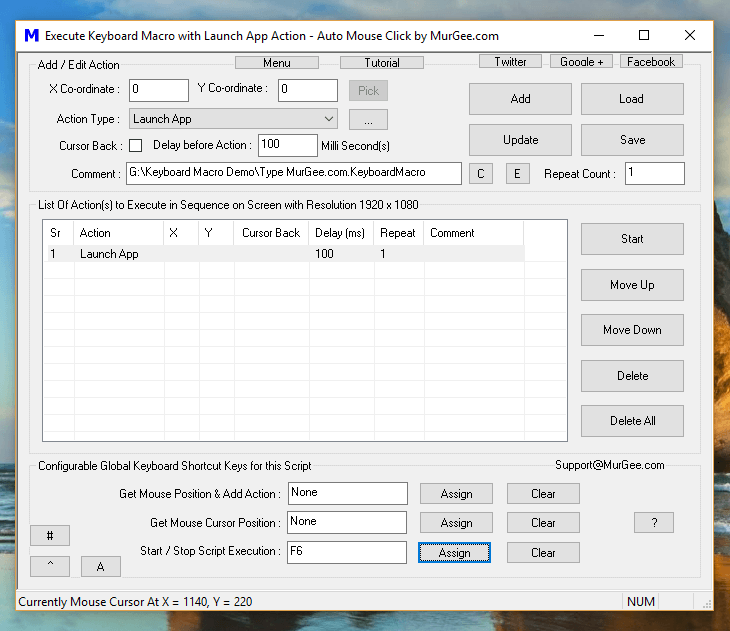
Execute Keyboard Macro with Launch App Action of Auto Mouse Click
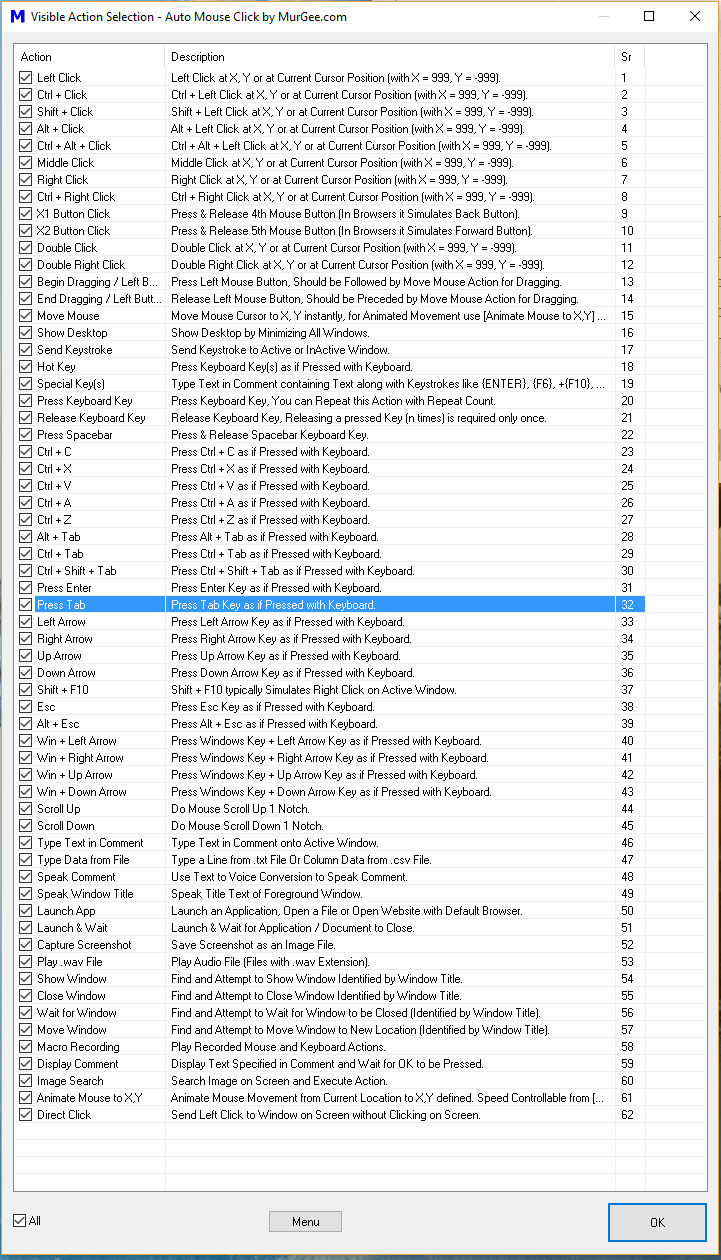
Note in the above Macro Script, there is only 1 Action inserted in the Macro Script. Executing Keyboard Macro from data File allows you to combine Keyboard Macro Execution with other Mouse, Keyboard and other Windows Actions available for automation. As of writing this post about Keyboard Macro Software, there are 62 Macro Actions available for Automation including Keyboard Automation Actions, Mouse Automation Actions, Window Automation Actions and other Windows Automation Actions.
All Macro Actions of Auto Mouse Click available for Automation
The Screenshot above displays 62 types of Macro Actions any of which you can add to your Macro Script and use them along with Keyboard Macro Recording. Note that the Editor of Keyboard Macro Software does allows you to edit time duration before Keystroke Down or Keystroke Up is executed. There is much more in this Auto Mouse Click Application making it the Best Mouse and Windows Automation Application available. The Latest version of the software does provides Sample Scripts which you can use to easily understand how to add Automation Action(s) to the Script and Execute them with Mouse or Keyboard Shortcuts.