How to Execute Macro Script
There are multiple ways to execute your macro script in Auto Mouse Click. This guide details each available execution method and provides links to specific tutorials for deeper exploration.
- Assign a keyboard shortcut to Start / Stop script execution.
- Create a desktop shortcut to execute a specific macro script.
- Right-click on a script file in Windows Explorer and select the Execute command.
- Schedule a macro script to run at a later date or time.
- Press the Start / Stop button directly on the main window.
1. Use a Keyboard Shortcut to Execute a Macro Script
Assigning a keyboard shortcut is the simplest and fastest way to control script playback. Once defined, the assigned key combination acts system-wide, allowing you to trigger or pause automation even when the application window is minimized. Note that global hotkeys remain active as long as the macro script window remains open.
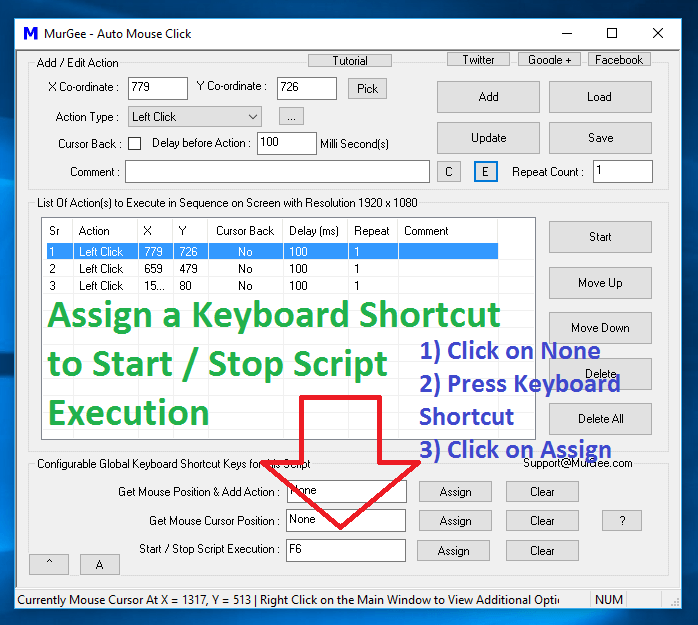
To assign a shortcut key to your script:
- Locate the Start / Stop Script Execution area near the bottom of the window.
- Click on the white shortcut input box (which displays None by default).
- Press your desired shortcut key combination on your keyboard (e.g., F6).
- Click the Assign button to save your keyboard shortcut.
To change or remove an assigned hotkey, click the Clear button or assign a new key combination. Pressing the shortcut while a script is running will halt execution immediately following the current action's delay.
2. Use a Desktop Shortcut to Start / Stop Script Execution
You can generate dedicated desktop shortcuts for individual macro scripts. Before creating a desktop shortcut, ensure your script file is saved to your disk.
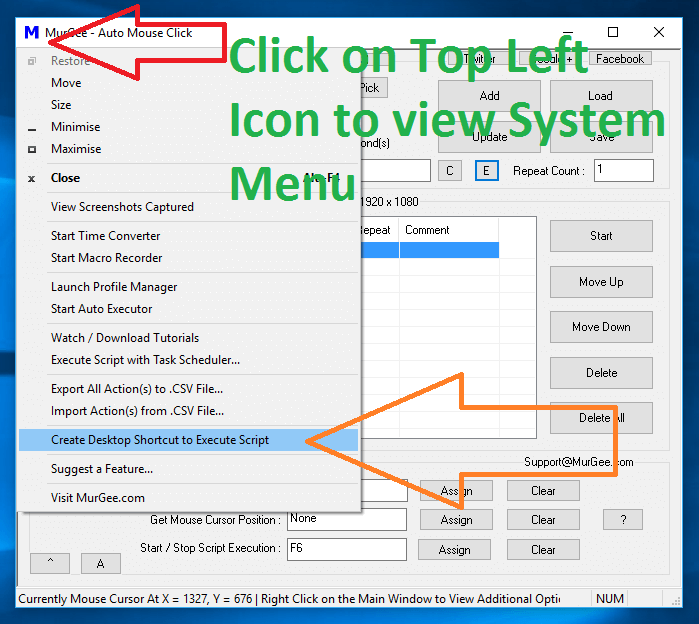
To create a desktop shortcut:
- Save your macro script file (`.mamc`) to any folder location.
- Click the top-left application icon to open the main menu.
- Select Create Desktop Shortcut to Execute Script.
- A File Explorer window will open with your newly generated desktop shortcut highlighted.
- (Optional) Right-click the desktop shortcut, select Properties, and assign a shortcut key in the shortcut properties dialog for global launch control.
3. Right-Click a Script File in Windows Explorer
You can execute saved macro scripts directly from Windows Explorer using the shell context menu. Double-clicking a script file opens it in the editor by default, whereas right-clicking provides an instant execution option.
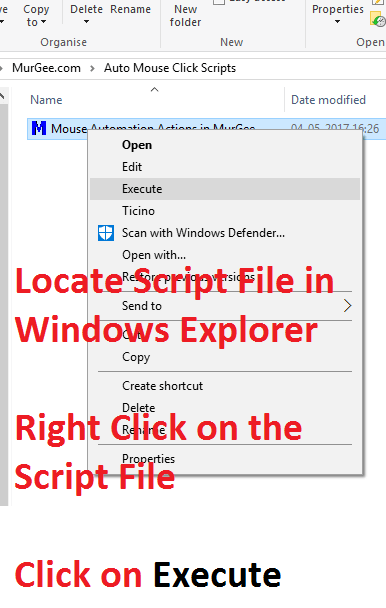
To run a script directly from Explorer:
- Navigate to your saved macro script file in Windows Explorer.
- Right-click the script file to display the context menu.
- Click Execute to launch macro playback immediately.
4. Schedule a Macro Script for Future Execution
You can configure scripts to run automatically at a specific date and time. Keep the application window open or minimized to allow the built-in scheduler to trigger execution. Read our Schedule Script Execution guide for step-by-step instructions.
5. Press Start / Stop on the Main Window
Clicking the Start button on the main window begins script execution step-by-step. While running, the button label changes to Stop, allowing manual cancellation at any point. Active actions are highlighted in sequence within the action list as execution progresses.
Before executing complex scripts, verify action parameters and delay times. Starting with small test macros is recommended before running extensive multi-step automation sequences.