Mouse Movement from Macro Script
There are multiple ways supported by this Mouse Automation Utility in which you can Move your Mouse Cursor around your Computer Screen. Mouse Movement across the Screen can be controlled by understanding the 2 dimension co-ordinates of your Computer Screen. Mouse Cursor Location is identified by X and Y co-ordinates and origin of the 2 dimension Screen co-ordinates start at the top left corner of primary monitor. Given below are the ways in which you can Move Mouse Cursor from a Macro Script.
- Move Mouse to a pre-defined Screen Location instantly identified by Screen X and Y Co-ordinates.
- Move Mouse Cursor by offset or relative Mouse Movement where you can specify by how much Pixels your Mouse Cursor is moved in Horizontal and / or Vertical Direction.
- Animate Mouse Cursor Movement to a pre-defined Screen Location identified by Screen X and Y Co-ordinates. The Mouse Cursor Movement Animation is configurable is is documented at Animate Mouse Movement post of this blog.
Apart from above mentioned Mouse Movement Macro Actions, all the Mouse Automation Actions support bringing Mouse Cursor back to it’s original Screen location with the help of Cursor back Checkbox. All the Mouse Clicking Actions do allow you to specify Screen X and Y Co-ordinates and Mouse Movement in all these actions is done instantly without any delay.
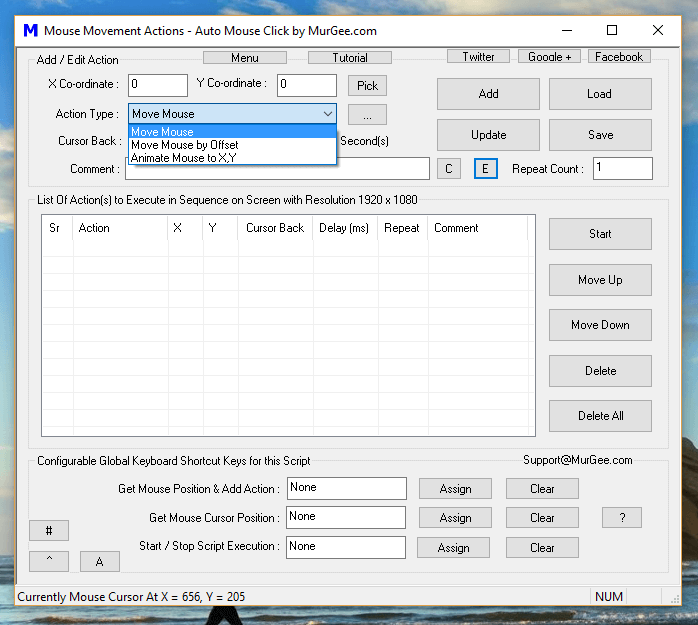
With Auto Mouse Click Application running, you can easily understand Screen Co-Ordinates by moving your Mouse Cursor to top left corner of your Primary Monitor and reading the Screen co-ordinates from the Status bar of the Application window as displayed in the screenshot above. Even when you have multiple Monitors connected to your Windows Computer, the origin of Screen co-ordinates start at the top left corner or your Primary Monitor. In case of Multiple Monitor Windows Computer, depending on your Virtual Desktop configuration encompassing all the Monitor(s), the X and Y co-ordinates can have positive or negative values.
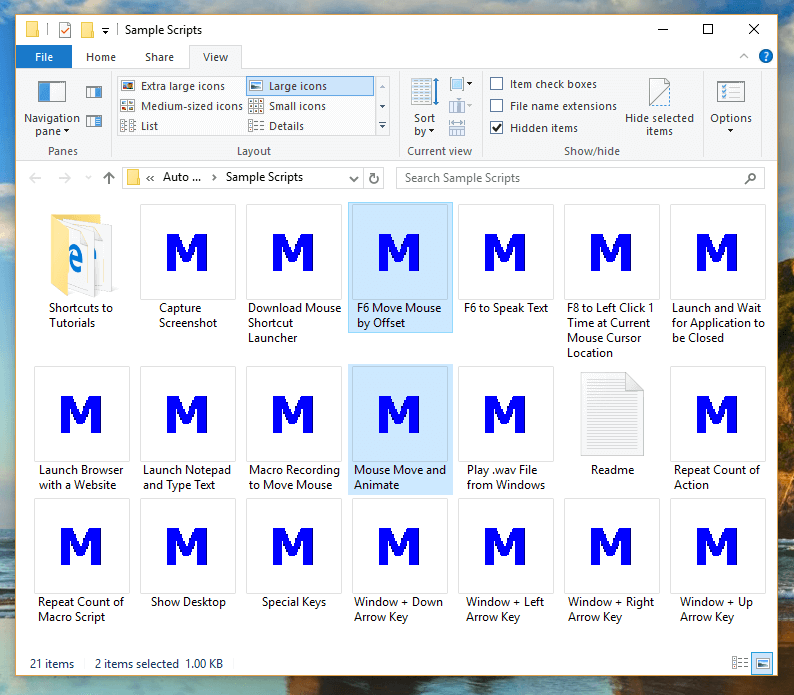
Mouse Movement Macro Scripts
Above Screenshot displays Sample Mouse Movement Scripts available in the installation folder. Note that one Sample Script displays how you can Move Mouse Cursor by offset or in other words, displays how you can move Mouse Cursor from current Mouse Cursor Location to let’s say 50 pixels in horizontal direction and 100 pixels in vertical direction. In order to understand the Mouse Movement by Offset, just double click on the sample script and start script execution to view Mouse Cursor Movement around current Mouse Cursor Location. Another Mouse Animation Script Example is present in the samples folder which Animates Mouse Cursor from top left corner of your Primary Monitor to another pre-defined screen location.
Auto Mouse Mover to Move Mouse Cursor
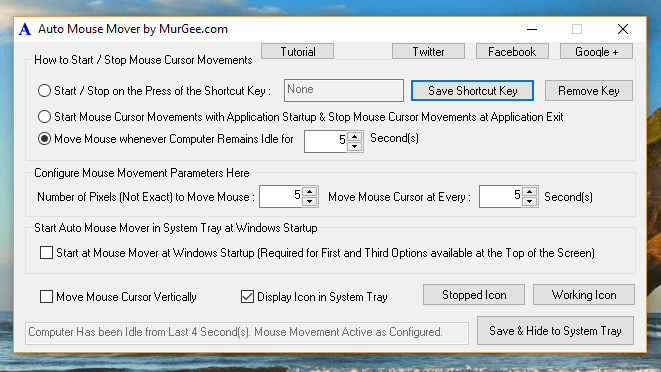
When you want to Move Mouse Cursor without writing a Script or Macro, you can use Auto Mouse Mover Application which is really easy and straightforward to use. The given below Screenshot displays the main screen of the software and allows you how and when you want to move your Mouse Cursor Horizontally or Vertically. This can be really handy when you want to Keep your Windows Computer Awake during a large file download or upload.
Auto Mouse Mover
There is no need to write a Macro Script to Move Mouse Cursor when using this Application, however it is available for a specific purpose and it serves it’s design process very well. This Mouse Cursor Moving Application ensures continuous Mouse Cursor Movement without disturbing your usage of Physical Mouse Cursor. As displayed in the Screenshot above, it can wait until the Computer is Idle or Inactive and only then Move Mouse Cursor to Keep your Windows Computer awake or active.
Automated Mouse Cursor Movement
The Software Applications presented above can be used to Automate Mouse Cursor Movement as required. Whether you want to show an Automated Presentation in which your Mouse Cursor Automatically Moves to pre-defined Screen Location with or without Animation, you can simply create a Macro Script and execute it with a keyboard or even a Mouse Shortcut. The Second Application presented in the above post provides Automated Mouse Movement so as to keep your Windows Computer awake for as long as you want.
Both of the above mentioned Mouse Automation Software Applications presented are available on a Free to Download and try basis. Once the Free trial usages have been used, you would be requested to pay a Software Registration fees. Yes both of the applications do work on 32 bit and 64 bit Microsoft Operating Systems including Windows 10, Windows 8.1, Windows 8, Windows 11, Windows Server 2022, etc. Automated Mouse Cursor Movement is now really easy and controllable. These Applications can indeed save you lots of time and efforts and yes can give your hand and fingers a rest.