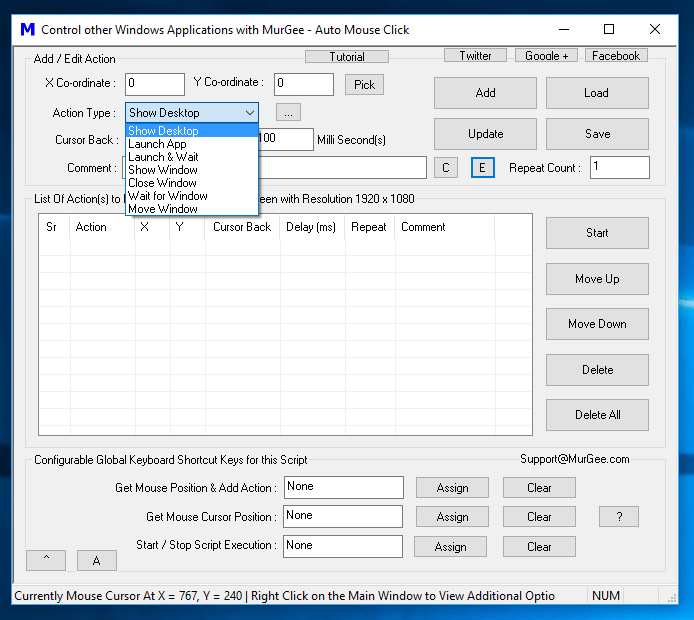
When you want to Control other Windows Applications from a Macro Script, you can use Application Control Macro Actions. This post provides a brief introduction about Controlling and Communicating with other Windows Applications from a Macro Script. First of all do have a look at the given below screenshot and note that only Application Control Macro Actions have been kept and other Mouse Clicking, Key pressing and other Macro Actions have been removed for the sake of simplicity.

Control other Windows Applications from the Macro Script
Note that in the above Screenshot, direct Application Control Actions have been kept. Yes you can have other Macro Actions enabled like Mouse Clicking, Macro Recording, etc, however as we are talking here about other Windows Application Control, only the Macro Actions which can directly control other Windows Application running on your Windows Computer have been kept for simplicity.
- Show Desktop : This Action when Executed Minimizes all the Applications running on your Windows Computer. Adding this Action at the top ensures that you always start your Macro Script Execution with exactly no Application Window on Screen.
- Launch App : This Macro Action when executed launches a Windows Application (File with extension .exe) or opens a document file with the default Application assigned for it.
- Launch & Wait : This Macro Action performs exactly like the Macro Action Launch App, however it waits for the Application launched to be closed. Once the Launched Application is closed, the Script Execution control can move ahead and execute remaining Macro Actions in the Script (If any).
- Show Window : The Show Window Macro Action when executed Shows a Minimized / Hidden Application Window when executed. The Window to be shown by this Macro Action is identified by it’s Title and is configured when creating the Macro Script.
- Close Window : The Close Window Macro Action closes an Application Window. Technically speaking, this Macro Action when executed presses the Close Button of the pre-configured Window identified by Window Title.
- Wait for Window : This Macro Action waits for a Window to appear on Screen identified by Title of the Window. The Window to wait for is configured when the Macro Action is added to the Script. This can be really handy when you are sure that a particular Application Window will appear during the Script Workflow.
- Move Window : This Macro Action when executed Moves an Application Window to pre-determined Screen Location. When you are using Mouse Clicking and other Screen Location specific Windows Automation tasks, fixed location of an Application Window during the Script Execution will ensure exact and correct Windows Automation.
When creating Macro Scripts to run for longer duration or even run unattended, do make sure that you do know and have planned Application Windows on your Computer. Display Resolution, Number of Monitors connected in Extended Mode, Application Windows on Screen and everything can have an important role in Accurate Workflow of Macro Script Execution. You might wish to Capture Screenshots from your Macro Script to create a Log of Script Execution. Once you do fully understand and control the Applications running on your Windows Computer at the time of intended Windows Automation, you can fully utilize above mentioned Windows Application Control Macro Actions in best possible way.

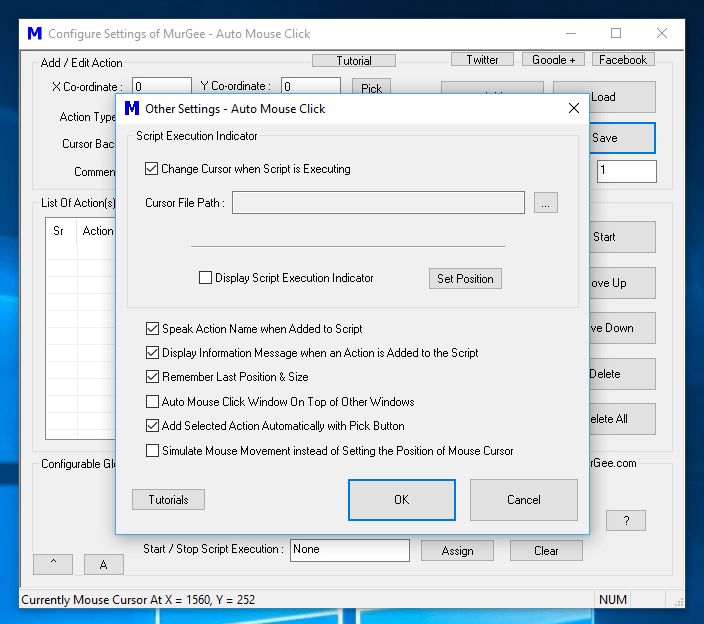
Other Settings of Auto Mouse Click to Control behavior of Script Editor and other parameters
An Information Box appears whenever you add a Macro Action that requires further input from your side. Once you are comfortable in adding Macro Actions to the Script and do understand the extra steps required to configure Macro Actions in the Script, you can use Other Settings Screen to disable Information Box and Audible Alerts when adding new Macro Actions to the Script. The above Screenshot of Other Settings Screen accessible from the Right Click Menu offers control over Script Editor behavior and other parameters which affect Script Execution.