There are multiple ways in which you can execute your Macro Script. This post talks about all of the available ways to execute the Macro Script. Short description is provided for all the Script Execution Methods and appropriate links are provided in this post to explore any specific Script Execution method in Detail.
- Assign a keyboard Shortcut to Start / Stop Script Execution.
- Create a Desktop Shortcut to Execute a specific Macro Script.
- Right Click on the Script File on Windows Explorer and use the Execute Menu Item.
- Schedule the Macro Script to run at a Later Date / Time.
- Press the Start / Stop Buttons on the Main Screen of the Software.
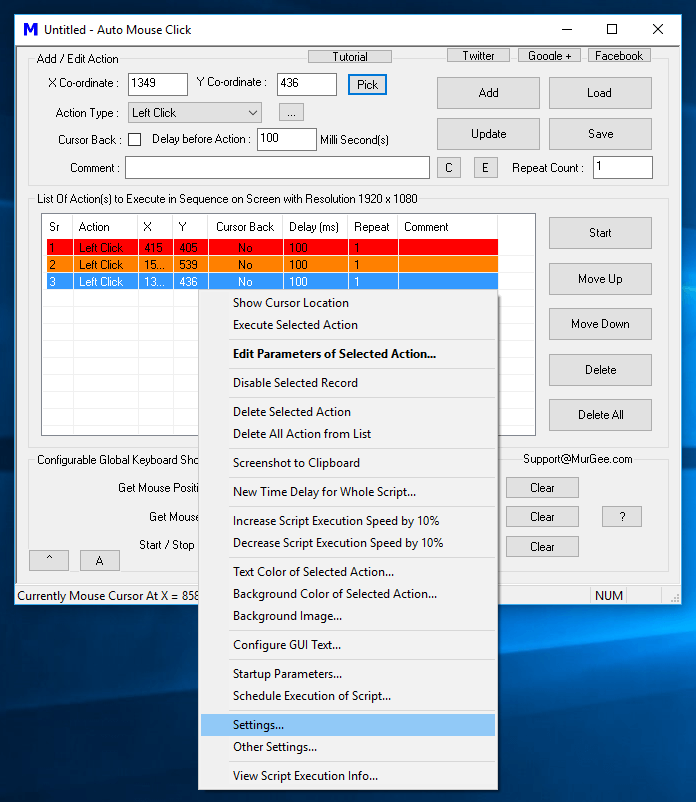
Use a Keyboard Shortcut to Execute a Macro Script
Using a Keyboard Shortcut to execute a Macro Script is the simplest way to execute the Macro Script. The Keyboard Shortcut Assigned in this method becomes a System Wide Keyboard Shortcut and works even when your Macro Script Window is Minimized. Once you Close the Macro Script Window, the Keyboard Shortcut Assigned to Start / Stop the Script Execution is no longer valid.
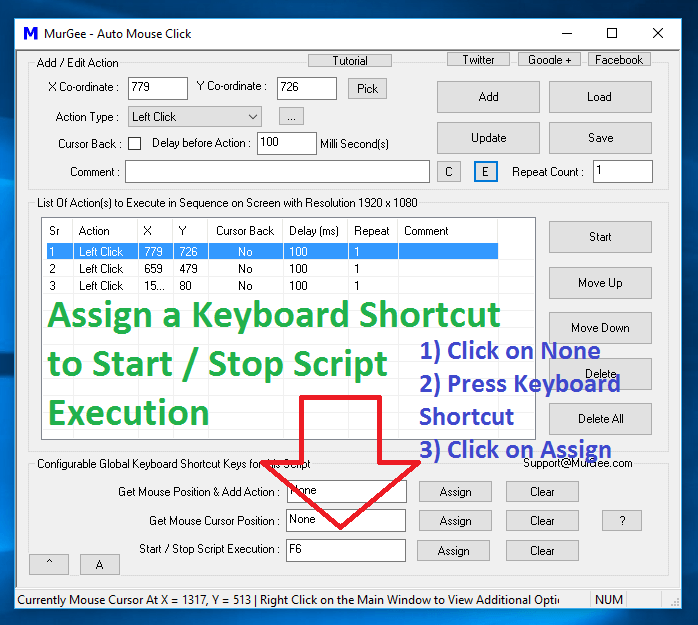
Execute a Macro Script with a Keyboard Shortcut
The procedure to Assign a Keyboard Shortcut to Execute a Macro Script is displayed in the Screenshot above and is outlined below:
- Locate Start / Stop Script Execution label at the bottom of the Macro Script Window.
- Click on the white colored shortcut control field (it has None written in it) just next to the found label, and click on it.
- Once you have clicked on the White Colored Shortcut Control (with None written on it), press desired Keyboard Shortcut. In the Screenshot above the Keyboard Shortcut F6 has been pressed as a Keyboard Shortcut to Start / Stop Script Execution.
- Now finally click on the Assign button and now you are ready to use this Keyboard Shortcut to Start / Stop Script Execution.
When you want to change the Keyboard Shortcut assigned to any Macro Script, you can click on Clear button to remove existing Keyboard Shortcut or simply Assign a new Keyboard Shortcut to Start / Stop Script Execution. Note that when the Script is running, press the Keyboard Shortcut would stop Script execution after the time delay of current Macro Action.
Use a Desktop Shortcut to Start / Stop Macro Script Execution
You can create a Desktop Shortcut to Execute any specific Macro Script. You do need to save your Macro Script before creating the Desktop Shortcut using the procedure displayed in the Screenshot below. Desktop Shortcuts can be assigned Keyboard Shortcuts which become System wide Keyboard Shortcuts and do exist until the Keyboard Shortcut Exists.
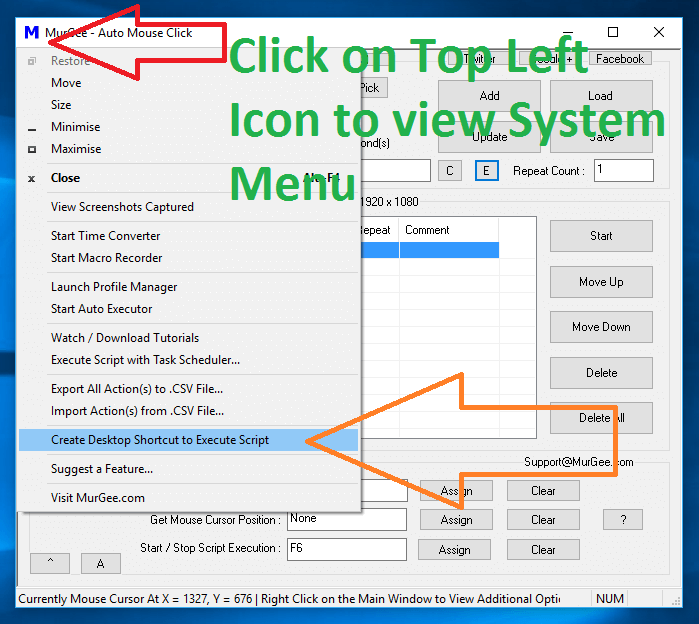
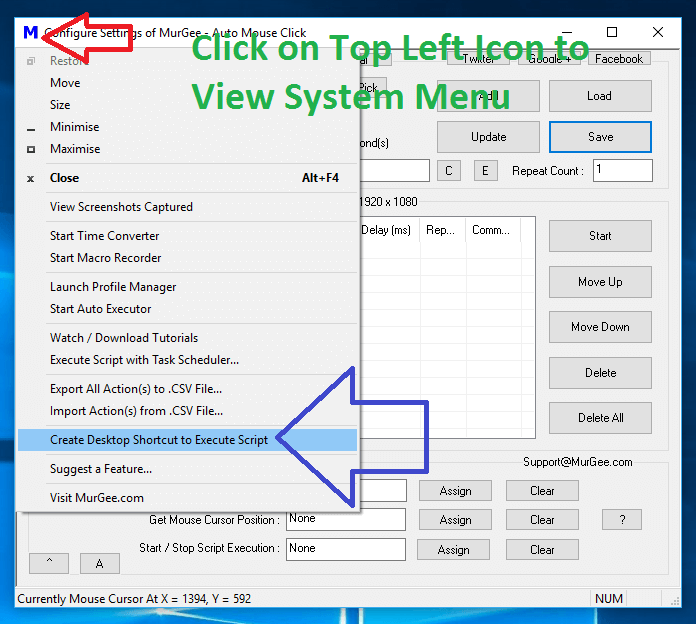
Execute a Macro Script with a Desktop Shortcut
The Desktop Shortcut created using this procedure is created on Desktop, however you can move it to any different location as you want later. You can also assign a Keyboard Shortcut to the Desktop Shortcut from the Properties Screen of the Shortcut. The procedure to create Desktop Shortcut is outlined as below:
- Save your Macro Script to any Folder Location.
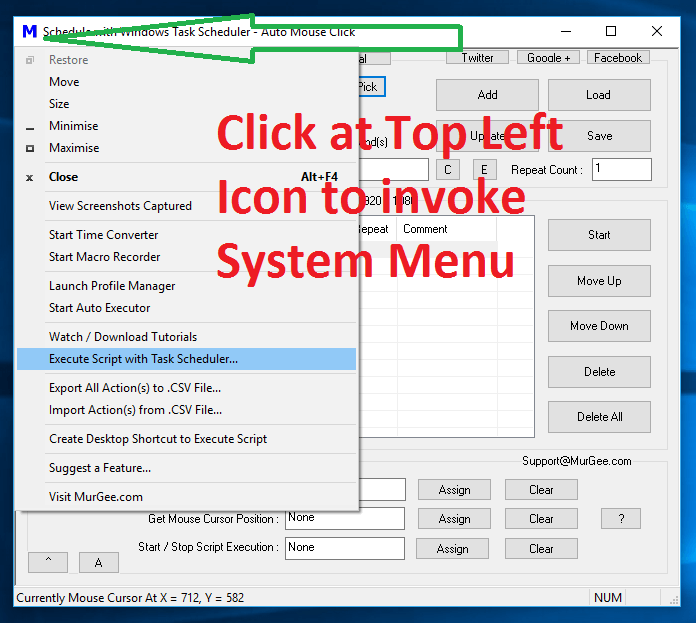
- Click on the Top Left Corner of the Script Window to view System menu of the Software.
- Click on the Menu item titled Create Desktop Shortcut to Execute Script as displayed in the Screenshot above.
- A Windows Explorer window will open with the newly created Desktop Shortcut selected and ready to use.
- Optionally Right Click on the Desktop Shortcut to view Context Menu and Click on Properties Menu item and assign a Keyboard Shortcut to execute the Desktop Shortcut and in turn execute the Macro Script.
In case you do follow step 5 above and Assign a Keyboard Shortcut, you do not need to keep the Macro Script Window Open for the Keyboard Shortcut to work. Yes whenever you want to remove the assigned Keyboard Shortcut to the Desktop Shortcut, you can modify properties of the Desktop Shortcut to remove the Keyboard Shortcut or delete the Desktop Shortcut altogether.
Right Click on the Script File and Use Execute Menu Command
You can Locate your Macro Script File in Windows Explorer and Execute the Macro Script by using the Execute Command from the Right Click Menu of Windows Explorer as displayed in the Screenshot below. This Method of Script Execution does not requires creation of any Desktop or Keyboard Shortcut, however without a Keyboard Shortcut (as created in Method 1 above), you will not be able to Stop Script Execution.
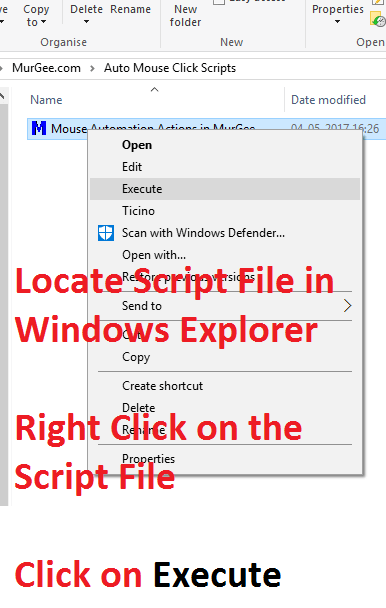
Execute a Macro Script from Windows Explorer with Execute Menu Command
The Procedure to Execute a Macro Script from Windows Explorer is as described below. Note that if you double click on the Macro Script File in Windows Explorer, it will open up the Macro Script for Editing unless the Startup Parameters of the Macro Script have been configured to Start Macro Script Execution.
- Locate the Macro Script File in Windows Explorer.
- Click on it’s file icon to select the Script File.
- Now Right Click on the Script File to view Context Menu as displayed in the screenshot above.
- Finally Select the Execute Menu Item and your Macro Script will start execution.
Note that if you have defined a Keyboard Shortcut to Start / Stop Script Execution, you can use that Keyboard Shortcut during Script Execution to Stop Macro Script Execution irrespective of the method used to Start Scrip Execution.
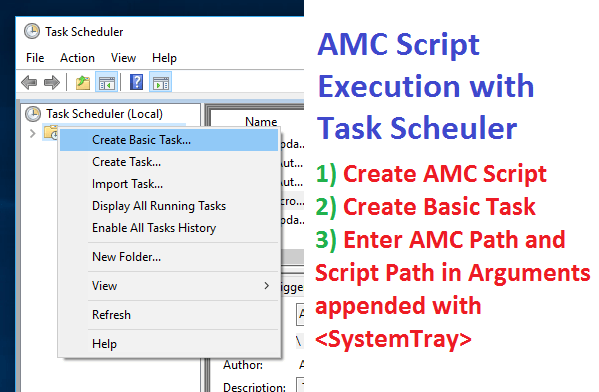
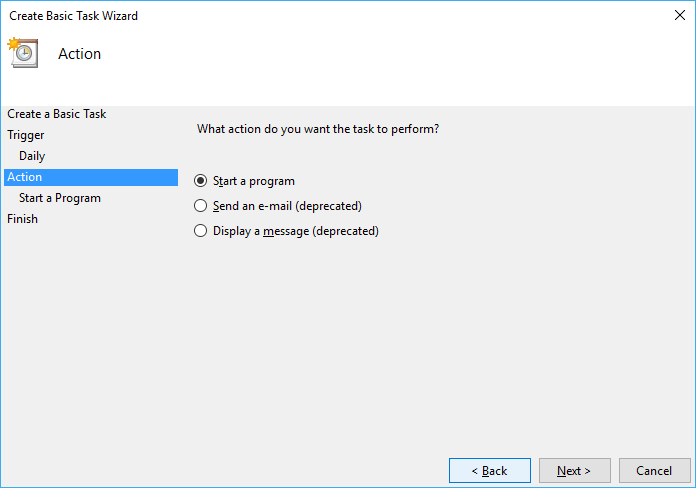
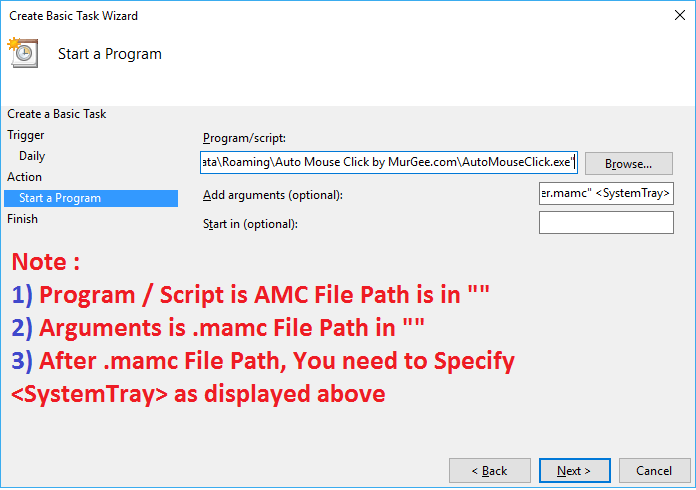
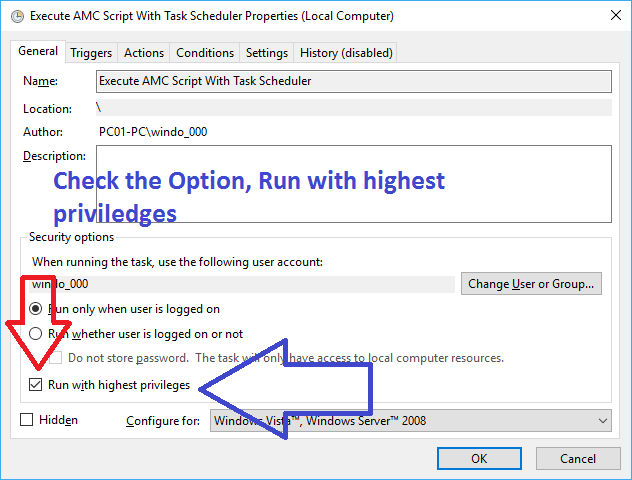
Schedule Macro Script to run at a Later Date / Time
This method of Macro Script Execution requires you to Keep the Script Window Open or Minimized and the Script Execution is started at pre-configured Date / Time. The post Schedule Script Execution talks in detail about using this method of Macro Script Execution. Yes as mentioned above the Keyboard Shortcut assigned to the Start / Stop Script Execution can be used to Stop Script Execution anytime during the Script Execution.
Press the Start / Stop Buttons on the Main Screen of the Software
You can press the Start Button on the Main Window of the Macro Script to Start Script Execution. When a Script is being executed, the title of the Start Button changes to Stop and can be pressed to Stop the Script Execution. Apart from title change of Start / Stop Button, the current Macro Action being executed is selected automatically in the List of Actions to be executed in sequence.
Before starting Macro Script Execution, do make sure that you do understand how does the Script works, what will the Script do and how much time it will take. It is always a good idea to make small scripts, understand how to use and control this Windows Automation Software and only when you are comfortable in controlling the Script Execution proceed towards making large Macro Scripts.